Moving or making Automatic Replies (OOF) stand out more
With the holidays going on, and the fact that you only receive the Automatic Replies (Out of Office) notices once, I’d like to keep track of who is away when.
As most people tend to write their substitute or an emergency number in the Automatic Reply message as well, I thought storing them into a separate folder (or having them stand out more so I don’t forget to move them) would be a good approach. I can then simply search within that folder
How would I move or color code these Automatic Replies without risking to also move or color code other messages?
 Keeping received Automatic Replies (also known as Out of Office or OOF message) like that for a while can indeed act like a quick and handy reference.
Creating a message rule to move these messages directly is easy enough but unless you regularly monitor that folder or work from a Search Folder such as the Today’s Unread Mail folder, you might miss the initial notification.
Also, you might want to be a bit more selective in which Automatic Reply message you’d like to keep. Making them stand out more between your regular mail so you can choose to move or delete them might be the better approach.
Moving Automatic Replies via a rule
 If you want to automatically move the Automatic Replies that you receive to a separate folder, you can create the following rule:
- Apply this rule after the message arrives
- which is an automatic reply
- move it to the specified rule
Note: In Outlook 2007, the condition is called “which is an Out of Office message”.
Color coding OOF messages
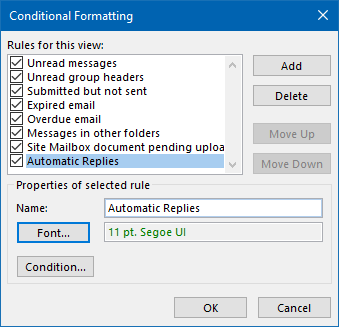
 To color code Automatic Replies without risking that regular email messages also get color coded, you can setup a Conditional Formatting rule in the following way:
- Open the Conditional Formatting dialog:
- Outlook 2007
View-> Arrange By-> Custom…-> button Automatic Formatting… - Outlook 2010 / 2013 / 2016 / 2019 / Office 365
tab View-> View Settings-> button Conditional Formatting… - Office 365 Single Line Ribbon
View-> Current View-> View Settings…-> button Conditional Formatting
- Outlook 2007
- Press the Add button and name the rule. For instance: Automatic Replies.
- Press the Font… button to set the highlighting options of your choice.

Create a new Conditional Formatting rule with a unique color. - Press the Condition… button.
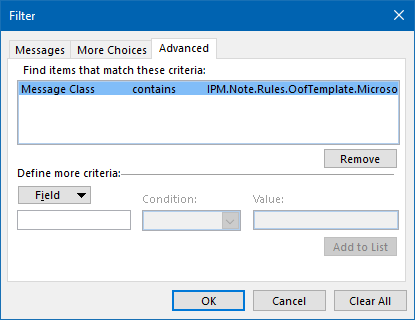
- Select the Advanced tab
- Type the following condition:
- Field:
Message Class - Condition:
contains - Value:
IPM.Note.Rules.OofTemplate.Microsoft
- Field:
- Press the “Add to List” button.
- Press OK until all dialogs are closed and you’re returned to the Inbox.

This manual Conditional Formatting filter will only apply to Automatic Replies.
Note: If you are receiving Automatic Replies which are not coming from an Exchange server, then you might need to look at other specific message properties. For instance, most subjects have a specific prefix or the message contains specific words in the message body for which you can create a filter.
Extra Tip 1: Mail Tips
 If you are sending to someone within your Exchange organization, a mail tip could display the Automatic Reply message for this person as well, regardless whether or not you’ve already receive such a notice (requires Outlook 2010 or later and Exchange 2010 or later).

Extra Tip 2: Quick Steps
 Instead of manually moving the Automatic Replies, you could create a Quick Step to move the message and directly mark it as read as well.
This saves you from a couple of clicks and the need to look up the folder. You can even add a keyboard shortcut to the Quick Step in case you prefer to process you mail via a keyboard.

