Switch from Gmail to Outlook.com
For a while now, I’ve been thinking about switching from Gmail to Outlook.com as there are so many features in Outlook which Gmail can’t support because it is using IMAP.
For instance, synching my Contacts and Calendar folders, synching my message rules, using Categories and Follow Up Reminders, Skype Contacts integration and so much more.
I’ve been quite reluctant to actually switch as nowadays so much depends on and is connected to your email address, it feels like I’m tied for life to use Gmail.
How can I switch from Gmail to Outlook.com as painless as possible?
 Switching your email address may at first sound like a very complex thing to do as you probably have used your email address to sign up for various services and many contacts also have your address. In addition, you probably also want to keep all your past emails, contacts and calendar items and move that to your new mail service.
However, when switching from a Gmail address to an Outlook.com address, the whole migration process is actually less complex than I initially thought.
Step 1: Already have a Microsoft Account with your Gmail address?
 While you could just signup for a new Outlook.com account, if you already have a Microsoft Account associated with your Gmail address (for instance if you used that to subscribe to Office 365 or to logon to OneDrive, Xbox Live or Windows 10), then it is best to simply add an Outlook.com alias to that Microsoft Account so you won't lose access to those services or have to move any data.
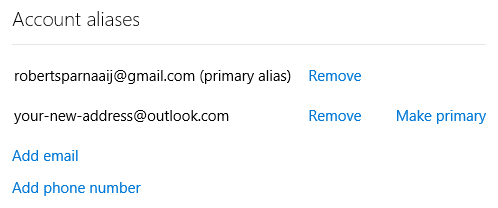
Once you've added the alias, make sure you set it as the Primary Alias for your Microsoft Account.

When your Gmail address is already a Microsoft Account, you can easily add an @outlook.com alias to it and set it as the Primary Alias.
Step 2: Configure your new Outlook.com account in Outlook
 Now that you have an Outlook.com account, you can configure it in Outlook.
It will most likely get configured as an Exchange account but in case a mailbox had already been assigned to your Microsoft Account and that mailbox hasn't been migrated yet to the new Outlook Mail platform, it will get configured as an Exchange ActiveSync (EAS) account or Outlook Hotmail Connector account instead.
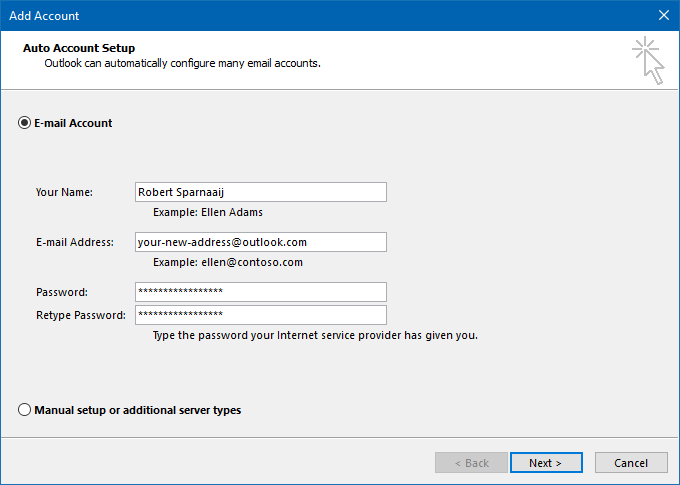
For detailed instructions to configure your Outlook.com account in Outlook see: Adding an Outlook.com account to Outlook.

Use Auto Account Setup to configure your Outlook.com account in Outlook.
Step 3: Configure Gmail to forward your email
 To receive all emails that are from now on sent to your Gmail account in your Outlook.com mailbox, you can configure Gmail to forward your email to your @outlook.com address so nothing will get lost.
To configure Gmail to forward your emails, use the Forwarding and POP/IMAP section in your Gmail settings.

By configuring Gmail to forward all your emails to your @outlook.com address, you don’t have to worry about missing any emails that are still sent to your Gmail address.
Step 4: Move over your existing emails from Gmail
 Assuming you already have your Gmail account configured in Outlook, you can simply copy over your current folders from your Gmail mailbox to your Outlook.com mailbox.
To copy the emails from default folders like the Inbox and Sent Items folder, press CTRL+A to select them all and then copy them to your corresponding folder in your Outlook.com mailbox.
Outlook will then automatically upload your emails to Outlook.com so you can still access them by visiting Outlook.com in your browser.
Note: This will not work when your Outlook.com mailbox hasn’t been migrated yet and is configured as an Exchange ActiveSync account in Outlook. In that case, also add your Outlook.com mailbox as an IMAP account. Once all the data has been copied and available in your online mailbox, you can remove the IMAP account again from Outlook.
Step 5: Move over your Contacts
 If you kept any Contacts in the Contacts folder of your Gmail mailbox in Outlook, you can simply move or copy them to the Contacts folder of your Outlook.com mailbox.
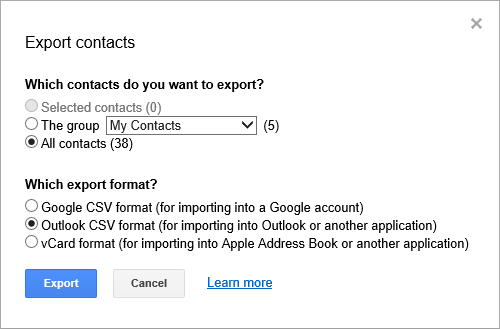
If you kept any Contact in the Contacts section of the Gmail website, then you can go to your Google Contacts page, press the More button, select Export… and choose to export to an Outlook CSV.

Exporting your Gmail Contacts to a CSV-file which Outlook can import.
Within Outlook, you can now import your Contacts via;
- Outlook 2007 and previous
File-> Import and Export… - Outlook 2010
File-> Open-> Import - Outlook 2013 and Outlook 2016
File-> Open & Export-> Import/Export
Choose “Import from another program or file” and then “Comma Separated Values”. In case it fails, verify that the Contact fields are mapped correctly.
Step 6: Move over your Calendar items
 If you kept any Calendar items in the Calendar folder of your Gmail mailbox in Outlook, you can simply move or copy them to the Calendar folder of your Outlook.com mailbox. This is best to be done by setting your Calendar folder to the List view.
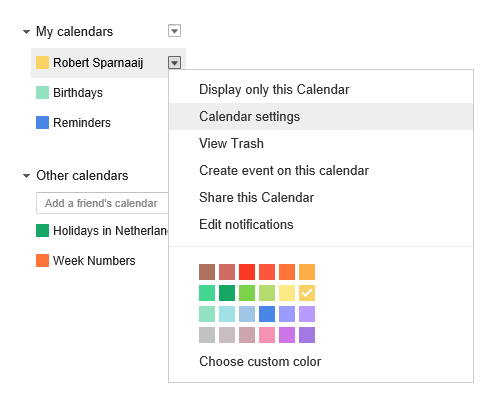
If you kept any Calendar items in the Calendar section of the Gmail website, then you can go to your Goolge Calendar page, hover with your mouse on the Calendar that you which to export, press the little down arrow which now shows behind it, select “Calendar settings” and choose Export this calendar.

Opening the Calendar Settings page in Gmail…

…to export the Calendar to an ICS-file.
Within Outlook, you can now import the ics-file, which is contained in the zip file you just downloaded, into your Calendar folder in Outlook via;
- Outlook 2007 and previous
File-> Import and Export… - Outlook 2010
File-> Open-> Import - Outlook 2013 and Outlook 2016
File-> Open & Export-> Import/Export
Choose “Import an iCalendar (.ics) or vCalendar file (.vcs)” and follow the on-screen instructions to import it.

