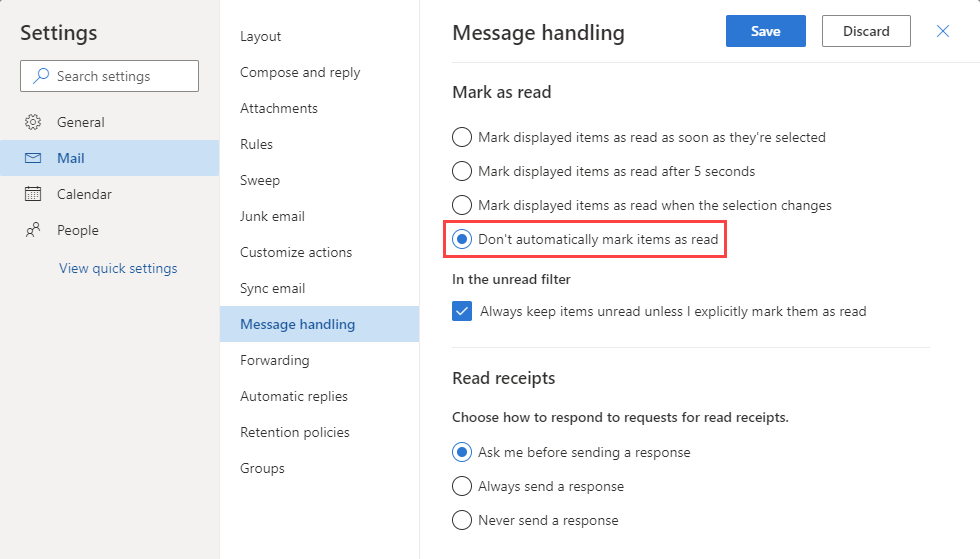
Do not automatically mark emails as Read in Outlook on the Web (OWA)
In the regular Outlook for Desktop, I’ve successfully disabled the option to automatically mark messages as read.
However, occasionally, I use Outlook on the Web (OWA) as well and it doesn’t seem to pick up the setting as configured in Outlook.
How can I prevent Outlook on the Web to automatically mark my emails as read?
 Outlook on the Web (OWA) indeed doesn’t pick up your “Mark as Read” settings as defined in Outlook for Desktop.
However, you can find the same settings in Outlook on the Web as well and still prevent emails from being automatically marked as read after a couple of seconds or when you select another email.
The exact location differs depending on which version of Exchange your mailbox is being hosted.
Exchange Online (Office 365 for Business)
 To change the “Mark as Read” behavior in Outlook on the Web for Exchange Online;
- Click on the Gear icon in the top right corner (left from your name).
- In the Settings panel that opens, click on “View all Outlook settings” at the bottom.
- In the Settings navigation panel on the left go to;
Email-> Message handling - Set the “Mark as read” option to: Don’t automatically mark items as read.
- Press the Save button.
Extra tip!
A quick way to get to this options as well, is to type “Mark as Read” in the Search field of the Settings panel which you open in Step 2.
Exchange 2016 / Exchange 2019
 To change the “Mark as Read” behavior in Outlook on the Web for Exchange 2016;
- Click on the Gear icon in the top right corner (left from your name).
- From the menu that opens choose: Options.
- In the Options navigation panel on the left go to;
Mail-> Automatic processing-> Mark as read - Set the option to: Don’t automatically mark items as read.
- Press the Save button.
Outlook.com
 To change the “Mark as Read” behavior in Outlook on the Web for Outlook.com with the new beta interface;
- Click on the Gear icon in the top right corner (left from your name).
- In the Settings panel that opens, click on “View all Outlook settings” at the bottom.
- In the Settings navigation panel on the left go to;
Email-> Message handling - Set the “Mark as read” option to: Don’t automatically mark items as read.
- Press the Save button.
Extra tip!
A quick way to get to this options as well, is to type “Mark as Read” in the Search field of the Settings panel which you open in Step 2.
Exchange 2013
 To change the “Mark as Read” behavior in OWA for Exchange 2013;
- Click on the Gear icon in the top right corner (right from your name).
- From the menu that opens choose: Options.
- In the Options navigation panel on the left select: Settings.
- In the “Reading Pane” section, set the option to: Don’t automatically mark items as read.
- Press the Save button.
Exchange 2010
 To change the “Mark as Read” behavior in OWA for Exchange 2010;
- Click on the Options button in the top right corner (below your name).
- From the menu that opens choose: See All Options…
- In the Options navigation panel on the left select: Settings.
- In the “Reading Pane” section, set the option to: Don’t automatically mark items as Read.
- Press the Save button.


