Always attach files from OneDrive as a copy and never as a web link
Whenever I attach a file that is located within my OneDrive folder on my computer, it is being attached as a OneDrive link with a cloud icon and not as an actual file attachment.
This also happens when I select a file via “Browse This PC…” and then select my locally cached OneDrive folder.
How can I configure Outlook so that it always attaches my files as actual attachments and not as a link to the file on OneDrive?
 Outlook has the option that allows you to send people links to files that you have stored in the Cloud like OneDrive Personal, OneDrive for Business or a corporate SharePoint server.
Sending a link instead of the actual file has several benefits such as keeping the email smaller and making sure that people are always using the latest version of the file.
Of course there are valid reasons to still send an actual file instead of a link.
While you can change the default, there are also various workarounds available when you want to remain flexible with how you are sending attachments.
Solution: Attachment options
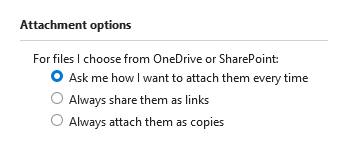
 If you do not like the default attaching behavior for files stored on OneDrive or SharePoint, you can luckily choose from 3 options;
- Ask me how I want to attach them every time.
- Always share them as links.
- Always share them as copies.
You can set this option via;
- File-> Options-> General-> Attachment options

Set your default online attachment behavior.
Note: When using Outlook 2016 (MSI), you may not have this option available to you. In that case, you can still use any of the workarounds below.
Workaround 1: Attach as Copy
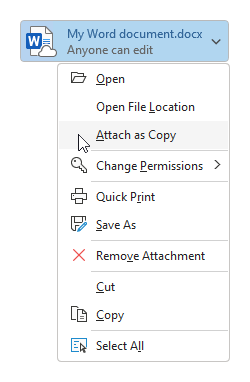
 A quick way to convert a Cloud Attachment into an actual attachment is to attach the file as usual and then click the down arrow next to the attachment. This opens a dropdown menu from which you can choose: Attach as Copy.
After choosing this command, Outlook will download the latest version of the file from OneDrive and attach it to your email.

Convert a OneDrive attachment into an actual attachment.
Note: The above option is not available when using OneDrive for Business (SharePoint).
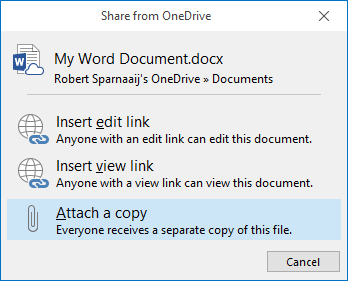
When you are composing in Plain Text format, you’ll get prompted how you want to attach the file when selecting a file that is located on OneDrive or other Cloud based storage;

Converting a OneDrive attachment when composing in Plain Text.
Workaround 2: Copy & Paste
 To bypass the need to select “Attach a Copy” and download the file, you can use the Attach File method to browse to the file as you’d normally do but instead of selecting the file and pressing the Open button, select the file and press CTRL+C to copy the file. You can then press Cancel to close the Attach File dialog.
Once returned to the message, press CTRL+V to paste the file as an actual attachment to your message.
This method also works for OneDrive for Business.
Workaround 3: Drag & Drop from File Explorer
 Yet another way to include actual attachments instead of OneDrive links is to attach the file via Drag & Drop from a File Explorer window.
This might sound complicated, but it is actually quite easy.
- Create and type your email as you’d normally do until you are ready to add an attachment.
- Open a File Explorer window (keyboard shortcut: Windows key + E).
- Browse to the file that you want to attach.
- Click and hold down your mouse button on the file.
- Move your mouse cursor within the message body of the email that you are creating and release the mouse button; The file will now show up as an actual attachment.
I use this method quite a lot as attaching a file via the regular method basically does nothing more than opening a smaller File Explorer window and I often already have a File Explorer window open at the file’s location when I just finished editing the file that I want to send.

Attaching files via the drag & drop method will always create actual attachments even when you are dragging from a OneDrive folder.
Workaround 4: Use the classic Attach File button
 As the first method is relatively slow (especially when attaching multiple files) and the drag & drop method might not be as convenient for everyone, there is also a way to bring back the “classic” Attach File button that isn’t “Cloud aware” at all.
When you use this Attach File button, you will always add the file as an actual attachment and never as a link to OneDrive or any other Cloud based storage.
You can add the command to the Quick Access Toolbar in the following way;
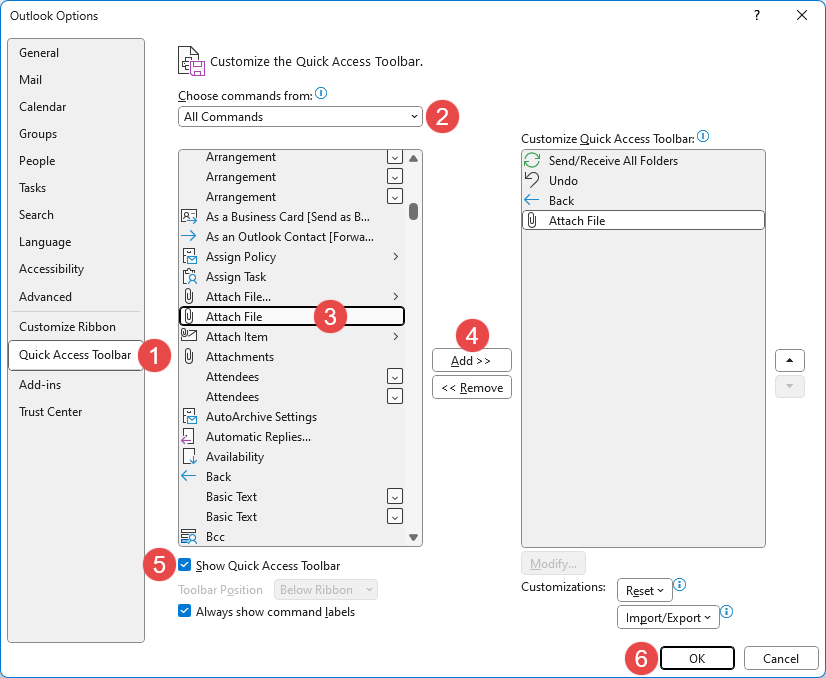
- File-> Options-> Quick Access Toolbar
- Set the “Choose commands from” dropdown list to: All Commands.
- Select the “Attach File” command.
- Make sure you do not select the “Attach File…” command as that is the new menu button.
- Press the “Add > > “ button.
- Outlook for Microsoft 365
- Verify that the Show Quick Access Toolbar option is selected below the left panel.
- Press OK to close the Options dialog and return to Outlook.
- When you also want to add this command to the QAT of the Message Compose window or the Appointment/Meeting window, then create a new message or Calendar item and repeat step 1 to 5.

Adding the classic Attach File command to the QAT.
You can add the classic Attach File button to the Ribbon as well. You must then choose “Customize Ribbon” in the Options dialog and create a new Group first before you can add the command to the Ribbon tab of your choice. For detailed instructions see: Adding commands to the Home or Message tab of the Ribbon.

