Restore a pst-file after configuring a POP3 account via Auto Account Setup
I’ve just switched to a new computer and configured Outlook with my POP3 account which automatically created the Inbox, Drafts, Sent Items, etc… folders listed under my POP3 email address.
I’ve been able to reconnect to my pst-files (outlook.pst and archive.pst) via:
File-> Open-> Open Outlook Data File
This successfully imported my Personal Folders, but listed them in a separate section below the email titled section rather than merged them.
I then tried running the Import and Export Wizard, but it displays a window showing:
"The Outlook data file (.pst) is already in use in the current profile".
How can I merge my pst-files restored from my backup with the newly created folders under my email address?
 You were already very close to solving this on your own and there are several ways to go from here to restore your Outlook configuration to the way you want it.
However, for future reference, it would have been better if you had directly configured your POP3 account with your existing pst-file rather than let Outlook create a new one. Unfortunately, Outlook doesn’t remind you of this option when it automatically configures the POP3 account for you via Auto Account Setup.
So don’t feel bad, it’s a common scenario that you landed in and is easy to fix via any of the methods below.
Method 1: Point your POP3 account to use the pst-file you've re-added
This method might look complex but is actually the fastest method of them all and the least amount of work.
- Open your Account Settings dialog
- Outlook 2007
Tools-> Account Settings… - Outlook 2010 and Outlook 2013
File-> Account Settings-> Account Settings…
- Outlook 2007
- Select your POP3 account.
- Use the “Change Folder” button at the bottom to set the delivery to the Inbox folder of your re-added pst-file.
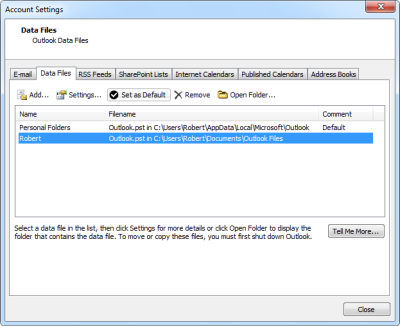
- Select the Data Files tab.
- Select the pst-file that you re-added
- Press the “Set as default” button.
- Restart Outlook.
Move the newly added items of your (mostly empty) new pst-file to the one you now have set as the default. Once you've done that, disconnect the empty pst-file via the Data File tab.

Changing the default pst-file to your original pst-file.
(click on image to enlarge)
Method 2: Manually move everything
This method is the most labor intensive but very easy to do; Simply move everything from your re-added pst-file the newly created one and then remove the pst-file via the Data Files tab in Account Settings (see Method 1 for directions to this tab).
To quickly move everything from the default folders, use CTRL+A to select all items n that folder and then CTRL+SHIFT+V to select a destination folder.
Subfolders can be moved by right clicking on them, and then choosing: Move Folder.
If they have any subfolders of their own, these are moved as well.
To easily select and move your Calendar items, switch the folder to a List view:
- Outlook 2007:
View-> Arrange By-> Current View-> All Appointments - Outlook 2010 and Outlook 2013
tab View-> button Change View-> List
Method 3: Disconnect the pst-file and then import it
This method is a bit more automated version of Method 2. However, depending on the size of your pst-file, this method could still take much longer than Method 1.
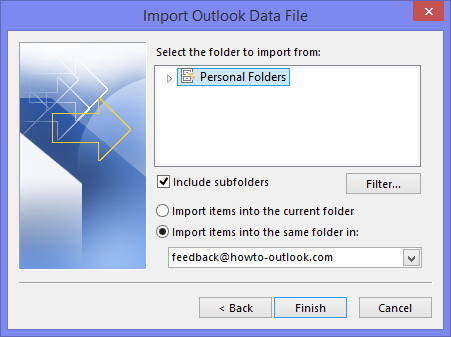
The reason that you got the error upon importing was because you already re-added the pst-file to Outlook. Remove (disconnect) the already re-added pst-file via the Data Files tab (see Method 1 for directions to this tab), restart Outlook, and then use the Import wizard.
- Open the Import and Export wizard
- Outlook 2007
File-> Import and Export… - Outlook 2010
File-> Open-> Import - Outlook 2013
File-> Open & Export-> Import/Export
- Outlook 2007
- Select: Import from another program or file
- Select: Outlook Data File (.pst)
- Select the pst-file you wish to import.
- Select the destination folder (your POP3 address).
- Verify that the option “Include subfolders” is enabled.

Make sure the pst-file is disconnected before you try to import it.
Method 4: Start over with a fresh restore of your pst-file
As mentioned before, it would have been best if you had configured your POP3 account directly with your restored pst-file.
This method is actually the best because it will also allow you to keep various meta-information like Message Rules and it won’t redownload any mail which was still left on the server (when using Outlook 2010 or Outlook 2013).
At this point, it might be the most complex method though but might be worth it if you want to keep this information and still have your original backup to restore from.
This fresh restore is needed because the restore that you have re-connected to Outlook might have lost (some of) its meta-data already.
After you’ve created a new restore of your pst-file, do the following:
- Close Outlook.
- Open the Mail applet in Control Panel.
- Click: Data Files…
- If you had already re-added the pst-file from a previous restore, select it and click: Remove.
- Use the Add… button to reconnect to your freshly restored pst-file.
- Click: Set as default.
- Select the E-mail tab.
- Select your POP3 account.
- Use the “Change Folder” button at the bottom to set the delivery to the Inbox folder of the pst-file you added in step 5.
- Close all open dialogs.
- Start Outlook.
Move the newly added items of your (mostly empty) new pst-file to the one you now have set as the default. Once you've done that, disconnect the empty pst-file via the Data File tab.

