Creating a shared group calendar without Exchange
For our sports club, I’m trying to create a calendar with our schedule to which everyone needs to have access. We don’t have Exchange but just a bunch of private POP3, IMAP and Outlook.com and Hotmail accounts.
Some of us need to have full read/write access but for others read permissions will do.
Would it still be possible for us to create a shared group calendar?
 There are several ways to go here, but creating a calendar via Outlook.com might be the easiest approach without the need to invest in 3rd party tools.
Depending on your needs, you can either publish the Calendar or, grant Read or Read/Write access to the Calendar for specific people only.
Step 1: Creating the Calendar on Outlook.com
 Go to https://outlook.live.com/calendar/
- Sign in with your Microsoft Account or create one if you don’t have one yet.
You can use your own current email address to sign up or create one with an outlook.com address (recommended) - Create a new calendar via “New calendar” in the bottom left of the Navigation Pane.
- Provide a name for the calendar and optionally select a different color or a charm after creating it and then right clicking on the Calendar name.
Step 2: Share the Calendar
 In your Calendar view, click the “Share” button at the top and select the calendar you created in Step 1.
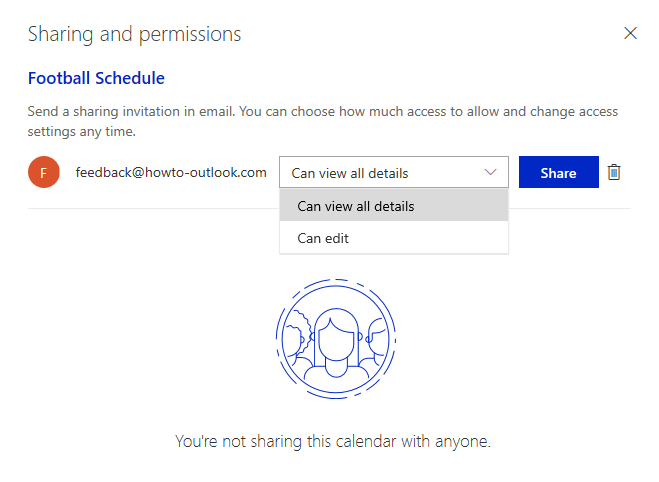
- Type the address of a person you want to share the Calendar with.
- Set the permissions level to “Can view all details” or “Can edit”.
- Press Share to apply the sharing permissions and send an sharing invitation email.
- Repeat step 2 to 4 to add additional people or close the dialog when you are done.

Set permissions on the shared calendar and send invitations by email.
Alternative: Publish Calendar (view-only access without email address)
 To quickly provide view-only access to people for who you don’t know the email address or when you want to share it without individually add all addresses, you can publish your Calendar and share a direct link instead.
- Click on the Gear icon in the top right corner (left from your profile image or initials).
- At the bottom of the Quick Settings dialog click: View all Outlook settings.
- Select: Calendar-> Shared Calendars
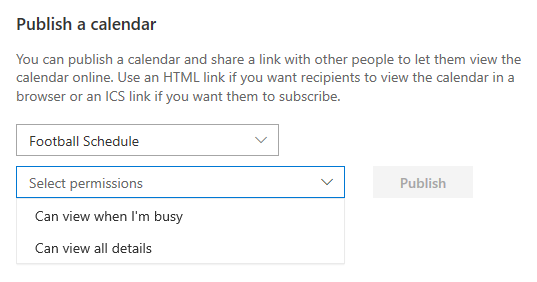
- In the “Publish a calendar” section, select the calendar that you want to share from the dropdown list.
- Select the sharing permissions for this link. Options are “Can view when I’m busy” and “Can view all details”.
This will generate links which you can share with people which may access your shared calendar without providing credentials. The HTML links can be used to open them in a browser and the ICS link can be used so that people can subscribe to it as an Internet Calendar in a Calendar app. Copy and paste these links in a new message and send it to your contact(s).
While this is a less secure method, as the link may be posted publicly by someone, this might not be too dramatic depending on the contents of the shared calendar. You also have the option to reset the calendar links which would invalidate the previous view-only links immediately.

You can set the level of details when publishing your Calendar.
Step 3: Access a Shared Calendar in Outlook
 When you’ve set permissions on the Calendar, people will receive a message with a link to accept the invitation. When they do, they can log on to the Outlook.com Calendar website with their own Microsoft Account (which should match the addresses that you’ve supplied in step 2). This can even be a Gmail address.
To access the Calendar in Outlook they must configure the Outlook.com mailbox for their Microsoft Account in Outlook, if they hadn’t done so already.
Once the account has been added, the shared calendar should be added automatically within a few minutes to the Calendar Navigation (CTRL+2) under “Other Calendars” and in your Folder List Navigation (CTRL+6) as a subfolder of your default Calendar folder.
Currently, the Shared Calendar will be added as “Read Only” even when you have been assigned “Can edit” permissions. A future update for Office 365 will add support for edit rights as well.
In general, Calendar updates should show within a few minutes for everyone.
Note: You can use the Outlook.com account for just the Shared Calendar feature; There is no need to also use the mail features if you do not want to.
Alternative: Access a Published Calendar in Outlook (read only)
 When you’ve published a Calendar and shared the HTML link, then people can access the Calendar via an Internet browser.
When you’ve shared the ICS link, then people can use this to subscribe to it in Outlook, and receive updates for it too, without the need of a Microsoft Account.
- Open your Account Settings
- Outlook 2007
Tools-> Account Settings… - Outlook 2010 / 2013 / 2016 / 2019 / Office 365
File-> Account Settings-> Account Settings…
- Outlook 2007
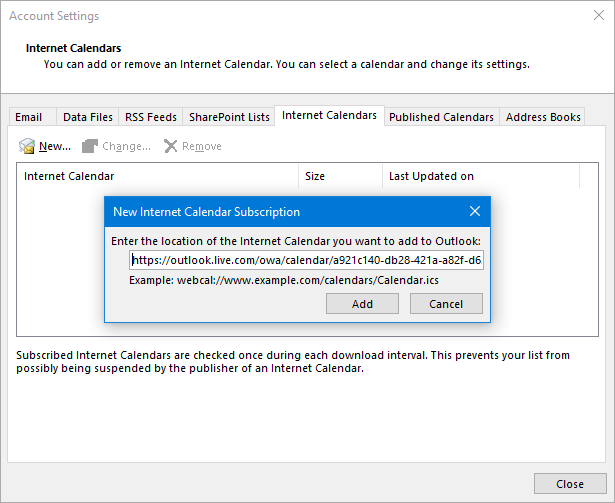
- Select the tab Internet Calendars
- Press the New… button.
- Paste the ICS link in the “New Internet Calendar Subscription” dialog.
- Press Add.
- After a few seconds, the “Subscription Options” dialog should appear. Here you can provide a display name for the calendar and additional options.
- Press OK and Close to return to the main Outlook window.
You should now see the Calendar in your Calendar Navigation (CTRL+2) and in your Folder List Navigation (CTRL+6) under “Internet Calendars”.

Subscribing to an Internet Calendar in Outlook via a ICS link.

