Adding an additional or shared mailbox from the same Exchange organization to Outlook
I've been granted access to a shared mailbox on our Exchange sever. For this, I've been given the name and email address of the mailbox but I didn't get a password for it.
When I try to add the account, Outlook already resolves my current name and email address. While I can change this, it then also asks for the password which I don’t have.
How am I supposed to access this mailbox?
 This is one of those issues which is easier to solve than you might think. However, your Exchange administrator must have granted “Full Access” permissions for that mailbox to your account for you to be able to add it as an Exchange account.
As an alternative, you might be able to add it as an additional mailbox rather than an additional account.
Either way, you should be able to do this without knowing the password for that mailbox.
Note: Contact the mailbox owner or your Exchange administrator if you are unsure about which permissions you have been granted for the mailbox.
Method 1: Add as an additional Exchange account
 When you add an account, you are prompted for the password belonging to the email address that you want to add. However, when you have Full Access to the account, you can also logon with your own credentials.
How to do this, might not be directly clear in the Add Account wizard in Outlook 2013 and previous, but luckily is much clearer in the new Add Account wizard in Outlook 2016, Outlook 2019 and Outlook for Microsoft 365.
- Instructions for: Outlook 2013 and Outlook 2016 (MSI)
- Instructions for: Outlook 2016, Outlook 2019, Outlook 2021 and Microsoft 365
Add Account: Outlook 2013 and Outlook 2016 (MSI)
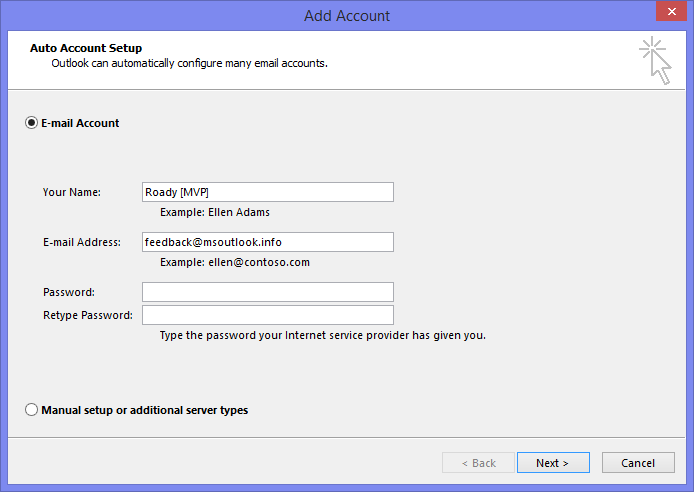
When you add a new account and your current username and email address is already filled out in the wizard, simply change the email address to the email address that you want to add and you’ll see a “Password” and “Retype Password” field appear.
Filling out these password fields is only required when you actually want to log on with the account which holds that email address. To log on with your own credentials, don’t fill out anything in these fields but click “Next” instead.

Don’t fill out a password when setting up a shared mailbox for which you have been granted “Full Access” permissions. (click on image to enlarge)
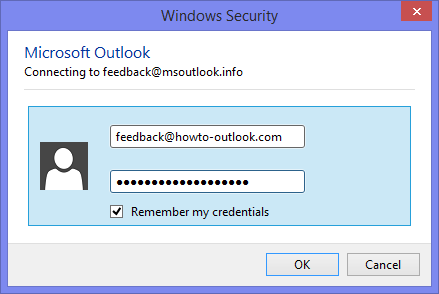
Auto Account Setup will now look up the server details and once it has found them, it will prompt you for your user credentials. You can now fill out your own username and password.
Depending on how your domain has been configured, you must specify your username in one of the following formats:
- username
- domain\username
- youraddress@domain.com

When prompted for credentials, fill out your own username and password instead of credentials of the shared mailbox itself.
When you indeed had been granted “Full Access” permissions to the mailbox, the account configuration will be successful and the mailbox will be added to your account list and Folder List.
Add Account: Outlook 2016, Outlook 2019, Outlook 2021 and Microsoft 365
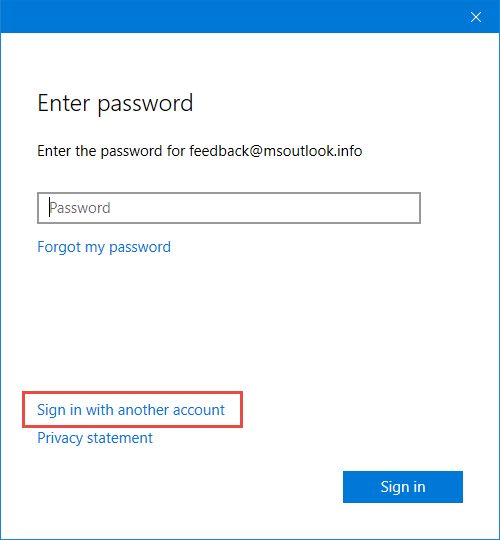
When you add a new account, you are first only prompted for the email address. In the second step, you’ll be prompted for the password belonging to that email address.
Instead of supplying the password for the shared mailbox, click on the “Sign in with another account” link at the bottom of the dialog. You’ll now be prompted for you own login name or email address to login and your password in the next step.

Click on the “Sign in with another account” link to logon to a Shared Mailbox, for which you have Full Access permissions, with your own credentials.
Once the authentication has completed, the Shared Mailbox will be added as an additional account with your own credentials.
Important!
When you have been granted “Full Access” permissions to the mailbox but your administrator has also enabled the “Automapping” property for it, then the mailbox might have been added as a “hidden” additional mailbox already. Having a mailbox connected as both a Shared Mailbox and as an additional account is not supported and causes a variety of issues. If you see the shared mailbox added twice, you must ask your administrator to remove the Automapping property. For further details see: Can’t remove additional Exchange mailboxes.
Method 2: Add as an additional Exchange mailbox
 When you don’t have been granted “Full Access” permissions to the mailbox by your Exchange administrator, you might only have been granted “Folder-level” or “Delegate” permissions by the mailbox owner.
In that case, you can add the mailbox to your Outlook configuration without password in the following way:
- Open the Account Properties dialog:
- File-> section Info-> Account Settings-> Account Settings…
- Double click on your Exchange account to open its properties.
- Click on the button: More Settings…
- Select the Advanced tab.
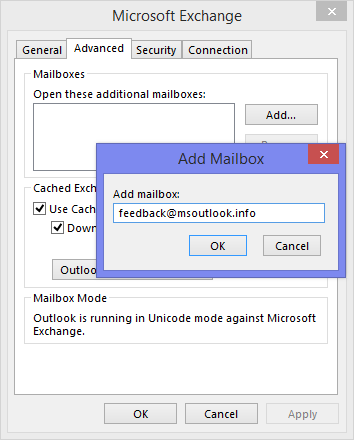
- Click on the button: Add…
- Type the name or the email address of the mailbox which you’d like to access.
- Confirm all the open dialogs to return back to Outlook.
The mailbox should now be added to your Folder List.

Via your Exchange account properties, you can add a shared
mailbox as an additional mailbox rather than an additional
Exchange account.
Note: If you can’t expand the mailbox, you haven’t be granted the correct permissions by the mailbox owner. Most likely you haven’t been granted the “Folder visible” permission on the top level folder of the mailbox itself (important!) and/or any of the subfolders which you are allowed to access. Once the permissions issue has been solved, restart Outlook and you should be able to open the mailbox.

