Including a screenshot or clipping in your email
Ever wanted to include a screenshot in your email?
For instance, when requesting technical support or providing it, it often can be handy to include screenshots directly in your email message to clarify an issue or to provide instructions.
Outlook does actually have a cool feature to quickly insert a screenshot or a clipping, but there are even more way to easily and quickly insert a good looking screenshot in an email.
 While inserting a screenshot in your email message body is already possible since HTML formatted emails, having the ability to take and insert the screenshot directly from within Outlook is still a welcome feature.
Below you’ll also find other methods to insert a screenshot in your email and instructions on how to crop the screenshot afterwards if needed.
Screenshot feature in Outlook
 You can find the Screenshot command on the Insert tab.
When you use the Simplified Ribbon (Microsoft 365), then you’ll need to press the ellipsis (…) menu button on the right to see the command.
When clicking the button, you’ll get a gallery of screens of all running applications which aren’t in a minimized state. Clicking any of these screens will insert a full image of that application.
If you only want to insert a section of your screen, you can select the option Screen Clipping. The current message will automatically minimize so you’ll have a clear view of the underlying windows.
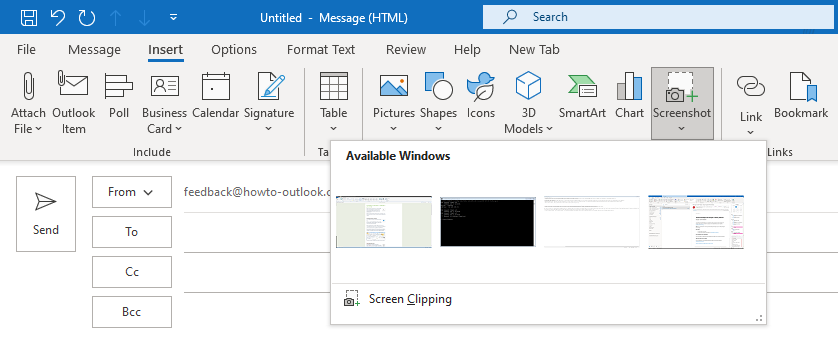
Inserting a screenshot or clipping has been made real easy in Outlook.
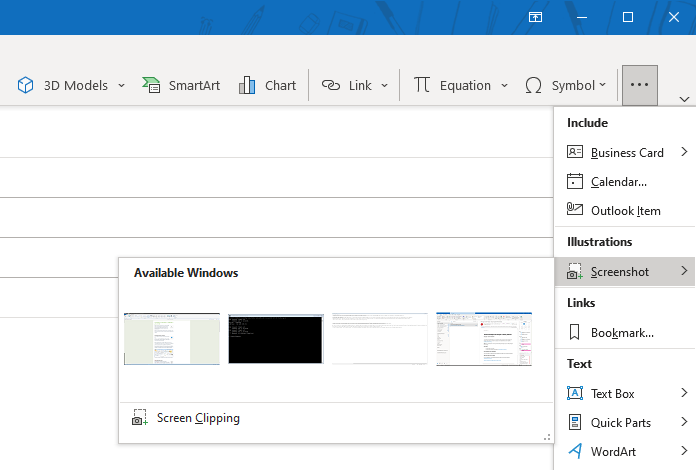
When you are using the Simplified Ribbon, inserting a screenshot or clipping can be done via the ellipsis menu.
PrtScn keyboard button
 Most keyboards these days still hold a key labeled “PrtScn” or “Print Screen” which is the classic way to create a screenshot. Originally, this key directly printed your screen output to a printer.
Nowadays, when you press this button, it will take a Full Screen screenshot of your current screen and will copy it to the Windows Clipboard. You can then paste it into your message (or any other application which supports pasting images) via CTRL+V.
When you hold the ALT button while pressing the PrntScn button, you’ll create a screenshot of the active window only, instead of your entire screen.
On a Surface tablet with a Touch Cover or a Type Cover keyboard, you can use the keyboard shortcut FN+Spacebar for the Print Screen function and FN+Spacebar+ALT to get the CTRL+PrtScn behavior.
Extra tip!
You can also assign the PrtScn to the Snip & Sketch application which makes it easier to capture what you want and edit if needed. More details are in the Snip & Sketch section.
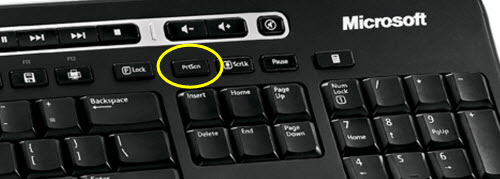
The Print Screen key is traditionally located above the navigation keys but can be located elsewhere on laptop-size keyboards.
Windows Key + PrtScn keyboard shortcut
 In Windows 8 and Windows 10, you can use the keyboard shortcut Windows Key + PrtScn to directly create a Full Screen screenshot which is saved as a png-file in your
 \Pictures\Screenshots folder.
On a Surface tablet, you can achieve this by holding the Windows Key on the front of the tablet itself and pressing the Volume Down button on the side of the tablet. If you have your keyboard attached, you can also use the Windows button on your keyboard + FN + Space bar.
Snip & Sketch
 In Windows 10, you can also take a screenshot of your screen via the keyboard shortcut; Windows Key + SHIFT + S.
This will take the screenshot with the built-in Snip & Sketch application.
When taking a screenshot, a bar will be shown at the top where you can easily switch between the following screenshot taking modes;
- Rectangle
- Freeform
- Window
- Fullscreen

Screenshot mode switcher.
The screenshot is then copied to your Clipboard so that you can paste it into your email via CTRL+V.
You can also choose to open it in Snip & Sketch via its notification for more options such as; annotating, writing, highlighting, erasing, cropping, saving, sharing, snipping with a delay and more.
You can even set Snip & Sketch as your default screenshot application when pressing PrtScn.
- Start-> Settings-> Ease of Access-> Keyboard-> Print Screen shortcut-> enable: Use PrtScn button to open screen snipping
Cropping the inserted screenshot afterwards
 If the inserted screenshot shows too much of the screen, you can crop it until it only shows the part that you want. You can activate the Crop feature in the following way;
- Select the image, select the Format tab and then click on the top part of the Crop button.
Once cropping is enabled, you can drag the center edges and corners of the inserted screenshot to remove those parts of the screenshot. This is similar to normally dragging the edges or corners to resize the image.
Upon sending, the non-visible areas of the image are automatically (and permanently) removed so the receiver cannot “recover” the rest of your screenshot and still see the things which you wanted to hide.
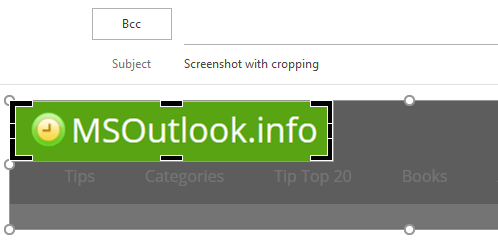
You can crop an inserted screenshot of for instance a web page to only keep the section that you want to show to the recipient.
Windows Snipping Tool, OneNote and other applications
 There are of course many other ways to create and insert a screenshot.
Some of my favorites are;
Snipping Tool
Windows also has the Snipping Tool to take screenshots. This is the predecessor of the Snip & Sketch tool that you find in Windows 10. Its no longer being developed but still useful on Windows 7 and Windows 8.
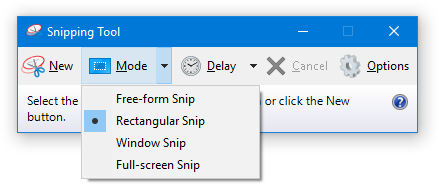
The Windows Snipping Tool offers 4 different ways to create a screenshot.
OneNote
OneNote also contains a screenshot feature which can be activated via the keyboard Windows+SHIFT+S.
After selecting what to include in the screenshot, OneNote will ask you what to do with the taken screenshot. There is an option “Copy to Clipboard” so you can easily paste it in your email.
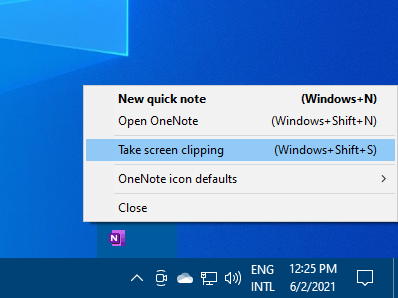
OneNote also holds a screenshot creation feature which
can be used for other applications as well.
3rd party tools
If you need more than just a simple screenshot feature, you can consider using SnagIt which is a fully featured screenshot manager. Aside from automatically keeping a history of taken screenshots, it also offers you to take screenshots of scrolling windows such as a long web page.
Jing is another screenshot tool which is offered for free and allows you to directly upload and share your taken screenshot. It will also keep a history of taken screenshots and has an option to create short screen recordings (videos) as well.

