Delivering Exchange emails to a pst-file in Outlook 2013 / 2016 / 2019 / Microsoft 365
In Outlook 2010 and previous I was able to set a pst-file as the default delivery location for my Exchange account.
In Outlook 2016, I no longer see the “Change Folder” button when I select my Exchange account.
How can I still deliver my Exchange e-mails directly to a pst-file?

The option to deliver Exchange emails to a pst-file has been removed since Outlook 2013.
The reasons for this are that, in general, corporations allow for larger Exchange mailboxes and online archives which takes away the need for off-loading mailbox data to pst-files. Also, there are many other reasons why doing this is a bad idea, which I covered in this previous tip.
However, there are still valid reasons for why you may still want to do this, and you can achieve it by configuring a message rule.
Rule for incoming emails
 Rather than setting the delivery location in your account settings, you must now configure a message rule to deliver the Exchange emails to a pst-file.
- Apply rule on message I receive
- through the specified account
- click on specified to select your Exchange account
- move it to the specified folder
- click on specified to select a folder in a pst-file
Optionally, you can now set the Inbox folder of the pst-file as the default startup folder via:
File-> Options-> Advanced-> Start Outlook in this folder
Rule for outgoing emails
 To also save your outgoing emails in a pst-file, configure this additional rule;
- Apply rule on messages I sent
- through the specified account
- click on specified to select your Exchange account
- move a copy to the specified folder
- click on specified to select a folder in a pst-file
This rule doesn’t actually move anything but just creates a(n unread) copy of the message in the other folder. This means that you still need to empty the Sent Items folder from the Exchange mailbox on a regular basis (this can be automated via AutoArchive) or disable the generic option to save copies of Sent Items in the Sent Items folder;
- File-> Options-> Mail-> section: Save messages-> disable option: Save copies of messages in Sent Items folder
If you have additional mail accounts and disabled the generic option to save to the Sent Items folder, you’ll need to create additional rules for each account if you still want to save them. For more details, also see: Sorting Outgoing E-mails.
Calendar, Contacts, Drafts and other special folders
 While the above rules do move the contents of the Inbox and Sent Items folders, it will not affect any other folders such as the Calendar, Contacts and even the Drafts folder.
In general, this isn’t a big issue since these folders remain relatively small in size. For Calendar functionality, this is actually better for the following reasons;
- It would still allow other people to see your availability when scheduling a meeting.
- You can share your Calendar with other people.
- Outlook can automatically process the incoming meeting requests.
If the Calendar still becomes too large for you over time and you want to off-load it to a pst-file, you can use AutoArchive to do so or move your old Calendar items manually.
Why not use POP3 instead?
 When you set your default delivery location for an Exchange mailbox to a pst-file, you are basically turning it into a POP3 account. In that case, it might also be more convenient to actually configure it as a POP3 account.
Exchange also supports POP3 and sometimes the Exchange administrator has also published these settings in Outlook on the Web (OWA);
- OWA 2010
Options (underneath your name in the top right)-> See All Options…-> Settings for POP, IMAP, and SMTP access… - OWA 2013
Gear icon (in the top right corner next to your name)-> Options-> Settings for POP or IMAP access… - OWA 2016 / OWA 2019
Gear icon (in the top right corner next to your name)-> Options-> Mail-> Accounts-> POP and IMAP - Microsoft 365 Exchange Online
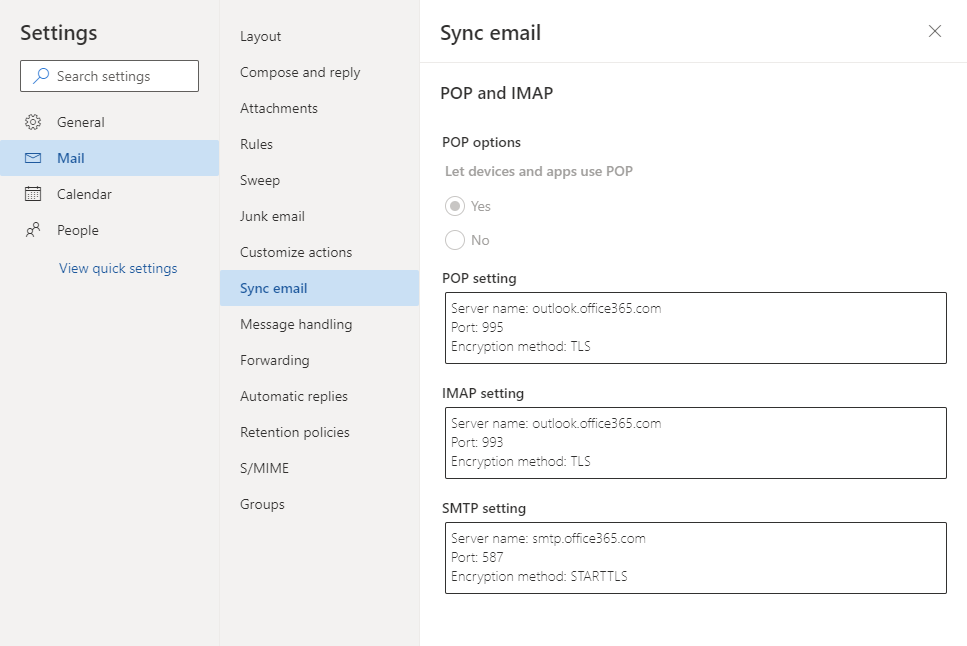
Gear icon (in the top right corner next to your name)-> link: View all Outlook settings-> Mail-> Sync email

POP3 and IMAP settings may be available in Outlook on the Web (OWA).
Note: When no settings are shown here, it doesn’t necessarily mean that POP3 is not available to you as this section is just for end-user documentation purposes and isn’t directly linked to your enabled Exchange mailbox capabilities.
In most cases, when configuring the POP3 account, you’ll need to press the More Settings… button and set the following options and ports:
- tab Outgoing Server
enable: My outgoing server (SMTP) requires authentication - tab Advanced
Incoming server POP3: 995 SSL
Outgoing server SMTP: 587 TLS
If the above doesn’t work, contact your Exchange administrator and ask if your account has been granted permissions to use POP3 and what the exact server settings for your environment should be.

