Add multiple or change Calendars in the To-Do Bar
I’ve configured multiple email accounts in Outlook and several of them have a Calendar of their own. I’ve also created a few additional Calendars of my own to separate between the type of appointments I have (work, private, sport club, my kid’s school schedule, etc…).
Within the Calendar Navigation, I can easily get an overview of all my appointments by using the Calendar Overlay feature.
However, the To-Do Bar only lists the appointments of the Calendar from one of my accounts.
Is there any way that I can add additional Calendars to the To-Do Bar or switch between them somehow?
 Unfortunately, the To-Do Bar doesn’t offer this level of flexibility. It will only show you upcoming appointments which reside in the default Calendar.
However, for some additional Calendars, you can still get regular Reminders.
A better approach might be to consolidate your appointments into a single Calendar as much as possible. With Categories, you can still easily distinguish between the “type” of appointment.
Default Calendar
 A quick way to determine which Calendar that is, is by double-clicking on a date in the Date Navigator of the To-Do Bar.
This doesn’t have to be the Calendar of your default account as it is controlled by which Data File is set as the default in your Account Settings. For more info about this see: Change the default Calendar folder.
Consolidate your Calendars
 Rather than splitting your appointments over multiple Calendar folders, it would be better to use a single Calendar folder and then Categorize your appointments instead.
To quickly assign a Category to all your appointments within a single Calendar and then move them to your Default Calendar is to select the List view.
You can create Filtered Views to achieve the same visual result as having separate Calendars with only one type of appointment item in them. Step by step instructions are given in the section below.
For accounts with their own Calendar, you might still receive Meeting Requests which are then added to the Calendar of that account. To get them into your default Calendar, you can create a rule to forward all the Meeting Requests to your other account. The rule condition you need for this is: Which is a meeting invitation or update.
Internet Calendars, Public Folder Calendars and delegate Calendars are of course a bit harder to consolidate into your own Calendar but you can still use one of the workarounds described in the “Reminder for additional Calendars” section below.
If you have an iCloud Calendar, you can sync it with your default Calendar via the Code Two Sync for iCloud add-in.
Filtered Views based on one or more Categories
 By using Filtered Views, you can still easily switch between your “appointments types” if you don’t want to always see them. Instead of switching between folders, you’d then simply switch between views.
- To define a view use:
- View-> Change View-> Manage Views…
- Choose the Day/Week/Month layout and name the View.
- Press the Filter… button.
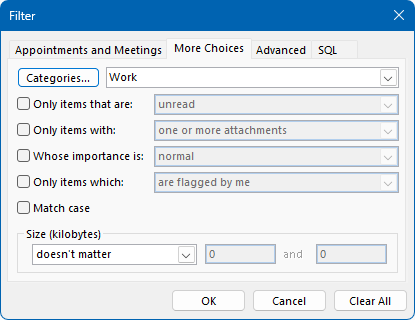
- Select the More Choices tab.
- Click on the Categories… button to select which Categories you want to see.
- Repeat the above for each selection of Categories.
- You can switch between your Filtered Views via:
- View-> Change View
Of course, you can also filter based on other properties besides the Category of an appointment or meeting.

Filtering your Calendar based on Categories.
Reminders for additional Calendars
 Even if you can’t consolidate all your Calendars, you’d still get Reminders for additional Calendars within all your mailboxes.
Unfortunately, Delegate Calendars and Public Folder Calendars are again the exception to this.
You can also enable reminders for Calendar items stored in archives and additional pst-files.

