Sync Hotmail Tasks
I'm using a Hotmail account and noticed that any tasks that I create in Outlook are not synced to the server. This means that my tasks also won't sync to my mobile phone nor my other computer.
I only have quite simple tasks, usually only consisting out of a subject and a reminder and sometimes a category.
Is there any way I can make my Tasks sync with Hotmail as well?
Sadly the Outlook Hotmail Connector only supports syncing Mail, Calendar and Contacts folders. However, by using a mail folder with a custom view and a message template, you can add simple Tasks support to your Hotmail account with synching capabilities.
Create a mail folder with a Task view
The first step to add synched tasks support to your Hotmail account is to create a new mail folder and give it a meaningful name. “Tasks” will do just fine.
- Select the newly created mail folder and define a new view;
- Outlook 2003
View-> Arrange By-> Current View-> Define Views… - Outlook 2007
View-> Current View-> Define Views… - Outlook 2010
View-> Change View-> Manage Views…
- Outlook 2003
- Click New…
- Name your view. For instance; Hotmail Tasks
- Select “Table” as the view type.
- Click OK.
- Click on the Fields… or Columns… (Outlook 2010) button.
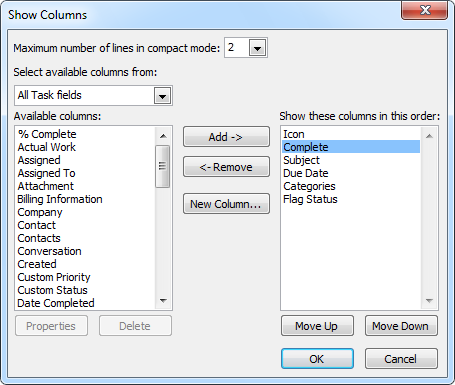
- Modify the fields list to include the tasks specific fields and to remove some mail fields. For a simple task list you can use the fields as shown in the screenshot;

The above columns can be used for a simple task list.
The "Complete" field can be found in the “All Task fields” list. - Click OK to return to the Advanced View Settings dialog.
- Click on the Other Settings… button and change the following options;
- Enable: Allow in-cell editing
- Reading Pane: Off
- Outlook 2010; Disable: Show messages from all folders in expanded conversation groups
- Click OK to return to the Advanced View Settings dialog.
- Click on the Sort… button and set the “Sort items by” list to “Due Date”.
- Click OK to return to the Advanced View Settings dialog. You can already use the view now or continue with setting the Conditional Formatting for the folder.
Conditional Formatting
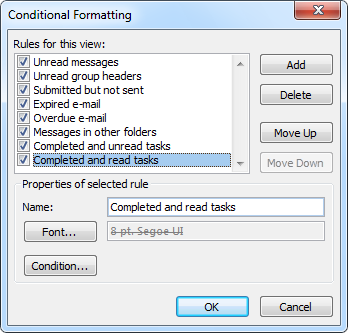
Conditional Formatting (or Automatic Formatting in Outlook 2003/2007) can be used to change the way that the font of the items look based on specific conditions. In this case, we can use it to create 2 rules to set the font for completed tasks to a gray and strikethrough font.
- Click on Conditional Formatting… or Automatic Formatting… button in the Advanced View Settings dialog.
- Click Add.
- Name the rule: Completed and unread tasks
- Click on Font… and set the following options;
- Effects: Strikeout
- Color: Gray
- Font style: Bold
- Click on Condition… and se the following options on the More Choices tab
- Only items that are: unread
- Only items which: are marked completed
- Now repeat the above for the second rule;
- Name: Completed and read tasks
- Font:
- Effect: Strikeout
- Color: Gray
- Font Style: Regular
- Condition:
- Only items that are: read
- Only items which: are marked completed
- Click OK to close the Conditional Formatting dialog, then OK to close the Advanced View Setting dialog and then Apply View in the Manage All Views dialog.

Conditional Formatting rules to treat completed mail items like tasks.
Message Template for Tasks
Now that the view is configured, we need to have a message template to work from as obviously you cannot use real task items in a mail view. Since you cannot directly create a message in the folder either (and Post items won’t sync with Hotmail), just send yourself an empty message. Once the message arrives, move it to the created Tasks folder.
Using Hotmail Tasks
Now each time that you want to create a new task, select the empty Template message and copy/past it via CTRL+C and then CTRL+V.
Since we’ve enabled the option “Allow in-cell editing” you can directly type your subject by clicking in the Subject column of the message. In the same way you can set the Due Date for an item. You can set a category by right clicking in the Categories column of the message and use flags just like you normally would do on message.
If you need to add more text or attachments, double click on the message to open it in its own window and place the message in edit mode. Choose Save when closing the message and the changed details will automatically be uploaded to Hotmail.

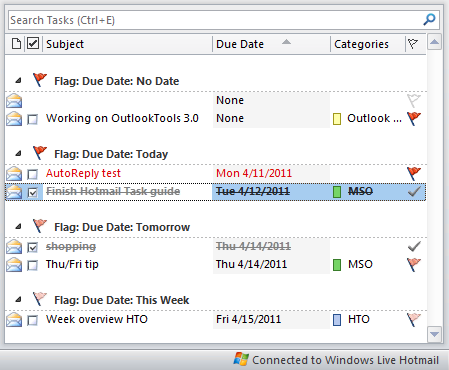
Simple Hotmail Tasks sync in action.

