Add all email senders or recipients as Contacts
Sadly, due to an oversight when migrating my Outlook data from one computer to the other, my AutoComplete cache was lost and since I never added people as a Contact, my Contacts folder is heavily outdated.
I'm now going through my Inbox and Sent Items folder and right click on a sender or recipient and choose: Add to Outlook Contacts
This is of course a really slow process and I think I've learned my lesson by now.
It there a quicker way to review the senders and recipients and add them to my Contacts folder without creating a massive amount of duplicate contacts?
 Unfortunately, there is no native option in Outlook for this, but with some clever use of the “Import and Export Wizard” and Excel, we can most definitely speed up the process and have full control over who will get added as a contact.
The 5 steps below describe the entire process which in reality only takes a few minutes to complete (it sure took longer to write them down).
As an alternative, to fully automate it and also to prevent you forget to add people as contacts in the future, you can use an add-in instead as well. Two of them are listed at the bottom of this guide.
Step 1: Export “From Name” and “From Address” to a csv-file
 In this example, we’ll use the Inbox folder as a source but you can use any other mail folder as well. See the section below Step 5 when you want to use the Sent Items folder as a source.
- Select the folder you wish to use as the source.
- Start the Import and Export Wizard.
- File-> Open & Export-> Import/Export
- Choose: Export to a file
- Choose: Comma Separated Values
- Verify that the correct folder is selected.
- Select a folder location and name for your csv-file.
For instance:export-addresses-inbox.csv - If not selected yet, select the checkbox in front of: Export “E-Mail messages” from folder: Inbox
- Press: Map Custom Fields…
- In the “Map Custom Fields” dialog press: Clear Map
- Drag and drop the following fields to the “To:” box on the right.
- From: (Name)
- From: (Address)
- Press OK and then Finish to start the export process.
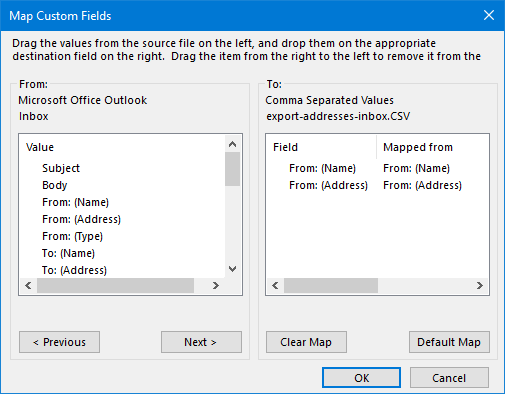
Make sure you only export the “From: (Name)” and “From: (Address)” fields.
Step 2: Remove duplicates
 As you've most likely received multiple emails from the some senders, we’ll remove the duplicates.
This is a very easy task we can perform in Excel.
- Open the csv-file in Excel.
If it opened with everything in a single column, use the Data-> Text to Columns feature to get the 2 fields in separate columns. - Select the entire A and B columns.
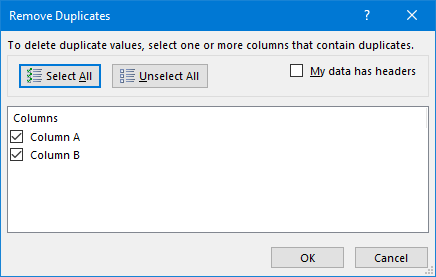
- On the Data tab click: Remove Duplicates
- Press OK to start the duplicate removal process.
Step 3: Remove internal Exchange address
 If you are using an Exchange account, then you’ll also see some addresses in the x500 format. As these are internal addresses of Exchange and these people are part of your Global Address Book, we can filter them out in the following way.
- Select cell A1.
- On the Data tab click: Filter
- Click the dropdown icon of cell B1.
- Choose: Text Filters-> Contains…
As the condition type:
@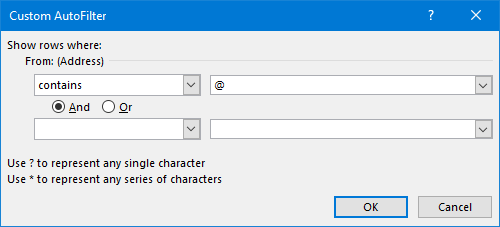
- Press OK to apply the filter.
- Select all the results (CTRL+A) and copy them (CTRL+C).
- Create a new sheet in Excel by clicking on the + or “new” icon at the bottom or by pressing SHIFT+F11.
- Paste the results in the newly created sheet (CTRL+V).
Step 4: Further filtering and saving
 Depending on whether you are happy with the current results, you can apply additional filters or review the remaining list of names and addresses manually. By right clicking on a row number and choosing “Delete” you can remove an entire row.
Once you are happy with the results, use the Save As feature in Excel. It is recommended to save it under another name such as: export-addresses-inbox-filtered.csv.
Make sure you save it as a csv-file and select to save only the selected sheet (your copied and fully filtered list) when prompted.

Step 5: Import the csv-file into your Contacts folder
 Now that you have a fully filtered list of names and addresses, you can import them as contacts in the following way.
- Start the Import and Export Wizard.
- File-> Open & Export-> Import/Export
- Choose: Import from another program or file
- Choose: Comma Separated Values
- Browse to the csv-file which you saved in Step 4.
- Select how duplicates should be handled when a contact with that name already exists in your Contacts folder.
- In the next step, select your Contacts folder.
- To prevent mistakes, you can also create a new Contacts folder for the Import process and then move these imported contacts to your main Contacts folder afterwards. To create a new Contacts folder, you’ll need to Cancel the Import process.
- If not selected yet, select the checkbox in front of: Import “export-addresses-inbox-filtered.csv” into folder: Contacts
- Press: Map Custom Fields…
- In the “Map Custom Fields” dialog press: Clear Map
- Drag and drop the fields from the left to the following fields in the “To:” box on the right.
- From: (Name) –> Name
- From: (Address) –> E-mail
- Press OK and then Finish to start the import process.
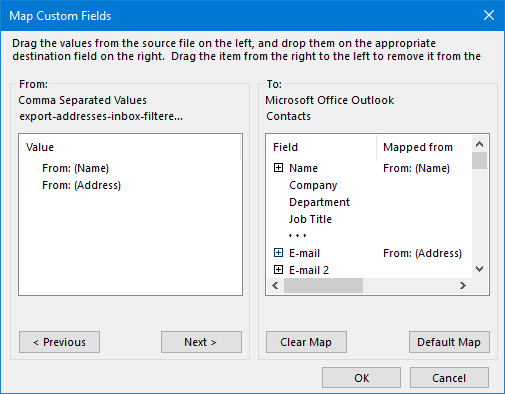
Map your fields from the CSV-file to the correct Contact fields in Outlook.
Note: When you don’t see both fields in the Map Custom Fields dialog, it means that you csv-file was not saved with a comma as the delimiter. To correct this see: Importing a contacts csv export.
Using the Sent Items folder as a source
 If you want to use the Sent Items folder as a source for your Contacts, then you can achieve this by exporting the To (Name) and To (Address) fields in Step 1.10.
However, in Step 4, you must filter out all the rules which have a semicolon ( ; ) in them as those rows contain multiple addresses which can't be directly imported as multiple contacts.
The same applies when you want to do this for the CC field for any mail folder.
Fully automate adding new contacts with an add-in
 Even though the above process is quite an efficient way to quickly review and add a lot of senders or recipients as Contacts, you can also fully automate it with one of the add-ins below.
- Add Email Address by Sperry Software (discount code: BH93RF24 )
- Add Contacts by MAPILab (discount code: 4PM76A8 )
Both add-ins offer the option to process already sent or received emails and also to select a Contacts folder to save the contacts to. They both are also careful not to create any duplicates even when that contact already exist in another folder.
In addition, they offer the option to add new contacts the first time you send an email to that person so you’ll never forget adding people as contacts again.
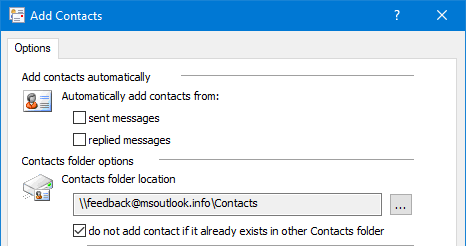
A few of the options of the Add Contacts add-in by MAPILab.

