Visual difference between Appointments and Meetings in the Calendar
I remember that in older versions of Outlook, Meeting items in the Calendar had an icon of 2 heads on them. This allowed you to easily tell them apart from Appointment items.
Is there any way to get this back or otherwise have some other indicator to easily see what is an Appointment and what is a Meeting item?
 Up until Outlook 2003, Meeting items indeed had the
 ![]() icon on them. For unknown reasons, this icon had been removed in Outlook 2007 (together with the Bell icon, which however saw a return in Outlook 2010 and later).
icon on them. For unknown reasons, this icon had been removed in Outlook 2007 (together with the Bell icon, which however saw a return in Outlook 2010 and later).
To still create a visual distinction between Appointment and Meeting items, you can use Conditional Formatting.
As Conditional Formatting is quite flexible, I’ll show you some additional examples how you can make it much more than just a simple icon replacement to highlight Meetings.
Highlight Appointments
 As basically all Meeting items have “Required Attendees” we can use this field to base the Conditional Formatting rule on as the following is true:
- Calendar items which have you as both the Organizer and the only Required Attendee are appointments.
- Calendar items which have you as the Organizer while the Required Attendee field is empty are appointments.
- The above statements are true unless they only have Optional Attendees (which is quite rare for most). In that case, see the “Optional Attendees only” section.
To show all the Appointments in another color, create the following Conditional Formatting rule with 3 criteria:
- Open the Conditional Formatting dialog
- Outlook 2007
View-> Current View-> Customize Current View…-> Automatic Formatting… - Outlook 2010, Outlook 2013 and Outlook 2016
tab View-> button View Settings-> Conditional Formatting…
- Outlook 2007
- Button: Add
- Name your rule. For instance: Appointments
- Select a color for your rule.
- Press the Condition… button.
- Select the Advanced tab.
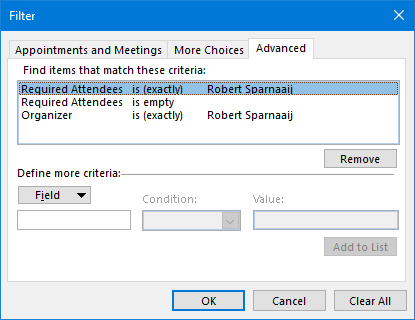
- Add the following criteria:
- Field: Required Attendees
- Condition: is (exactly)
- Value: <your display name>
- Add the following criteria:
- Field: Required Attendees
- Condition: is empty
- Add the following criteria:
- Field: Organizer
- Condition: is (exactly)
- Value: <your display name>
- OK yourself out of all the open dialogs to return to the Calendar.

The 3 filter criteria to find Appointment items and highlight them.
Note 1: Category colors will overrule Conditional Formatting colors.
Note 2: To clarify the example above; As we have specified the Required Attendees field twice, at least one of them must be true (OR condition). In all cases, the Organizer condition has to be true as well (AND).
Exception: Highlight Meetings with Optional Attendees only
 If you happen to have Meeting items with only Optional Attendees, add the following Conditional Formatting rule above the “Appointments” rule and set its color to “None”.
- Field: Optional Attendees
- Condition: is not empty
You can name this rule for instance: Meetings (Optional Attendees only).
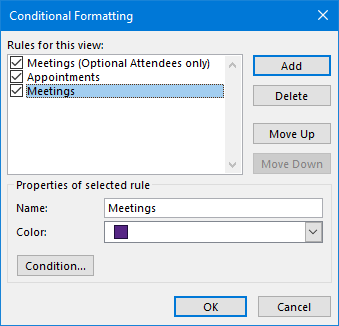
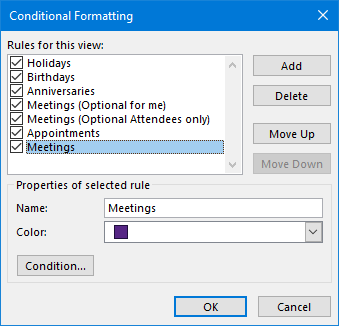
There is a screenshot at the bottom of this guide which shows the required sorting order for your Conditional Formatting rules.
Highlight Meetings rather than Appointments
 If you prefer to highlight the Meetings rather than the Appointments, do the following:
- Change the color of the “Meetings (Optional Attendees only)” rule to a color of your liking.
- Change the color of the “Appointments” rule to “None” or another color than you picked in step 1.
- Create a new rule called “Meetings” without any criteria and place it under the “Appointments” rule. Change the color for this rule to the same one that you picked in step 1 or another one as long as it is different from the one you picked in step 2. Ignore the warning that you get when applying the rule.

Mind the sorting order when adding rules.
The first one that applies colors the item.
Highlight Meetings for which I am an Optional Attendee
 The beauty of Conditional Formatting is, is that you can customize it to your liking. For instance, you can assign a different color to Meetings for which you are an “Optional Attendee” rather than a “Required Attendee”.
To do this, create a new rule called for instance “Meetings (Optional for me)” and place it above the “Meetings (Optional Attendees only)” rule or, if you did not create this one, above the “Appointments” rule. Pick a color you haven’t used before and set the following criteria:
- Field: Optional Attendees
- Condition: contains
- Value: <your display name>

While you are at it, why not also add some Conditional Formatting rules to highlight Holidays, Birthdays and Anniversaries?
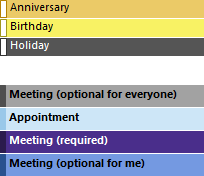
 An example of how the final result could look like in your Calendar.
Of course you can choose colors which are less bright ;-).

