Setting the Reading Pane at the bottom and other display options in Outlook on the Web and OWA
In Outlook Web App (OWA), I prefer to have the Reading Pane at the bottom but since I have been upgraded to OWA on Office 365 (I'm not sure whether this is Exchange 2013 or Exchange 2016), my Reading Pane is on the right again and I can’t find a way to change that to the bottom.
In OWA 2010, this option was under a View button at the top of my message list where I could also disable Conversation View. In addition, I don’t want the message list to show the first line of the email either. I just want things back to the way I had it configured in OWA 2010.
How can I configure all this in Outlook on the Web of Office 365?

Unlike in OWA 2010, the options to change your display settings are no longer located directly above your message list.
In OWA 2013, you won’t even find settings for this anymore in the Options page but you are still able to set it via a separate somewhat “hidden” Display Settings pane.
In Outlook on the Web of Exchange 2016 and Office 365, they’ve added it to the Options page for easier discoverability of the settings while also keeping the Display Settings pane.
The benefit of using the Display Settings pane is not only that you can adjust these options faster but it also allows you to set it on a per-folder basis.
Display Settings pane
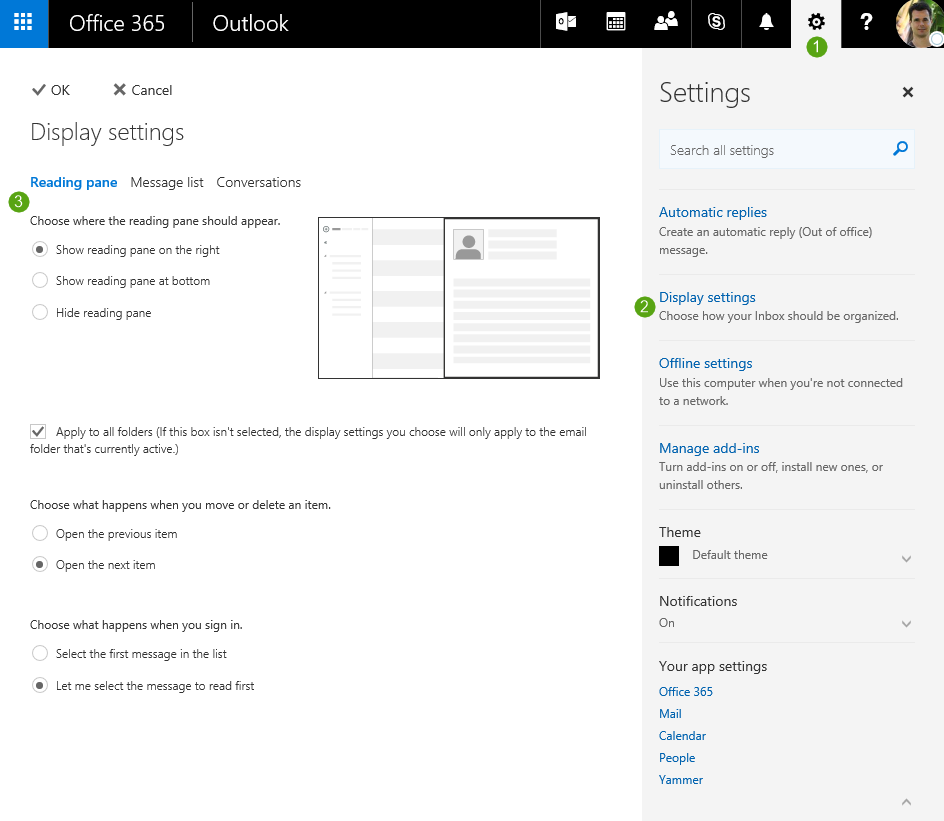
The Display Setting pane can be opened by using the Gears menu that is located in the top-right corner, left from your profile picture or name.
When you select “Display settings” from the gears menu, a new pane will slide in containing various options.

The actual menu will look a little bit different depending on whether you are using OWA 2013 or Outlook on the Web for Exchange 2016 and Office 365. (click on image to enlarge)
The Reading pane section allows you to specify whether the Reading Pane should be displayed on the right, at the bottom or should be hidden. There is also an option to apply this setting to all folders.
In the Message list section, you can show or hide the preview text and also set the option to either show the sender’s name or the subject on top.
In the Conversations section, you can set some options for the Conversations View. To actually disable Conversation View itself, you can use the menu which is displayed in the top right above your message list. When it is enabled, this list is called “Conversations by Date” and when disabled “Items by date”.
In OWA 2013, you may also find the following tabs;
- Junk Reporting
To participate in improving the definitions of the Junk email filter by sending samples. As this feature is being phased out and no more filter updates are being deployed, it is best to ignore this section. - Outlook Web App version
Here you can select to use Outlook Web App light which is optimized for older web browsers, low bandwidth connections and accessibility needs. Outlook on the Web of Exchange 2016 and Office 365, allow you to change this in Options-> General-> Light version.
Display Settings in Options page
 When you use Outlook on the Web of Exchange 2016 or Office 365, the Display Settings can also be controlled via the Options page.
- Exchange 2016
Gear menu-> Options-> Mail-> Layout-> Reading pane - Office 365
Gear menu-> Your app settings: Mail-> Mail-> Layout-> Reading pane
The available settings are the same as the screenshot shown above except for the ability to adjust it only for the current folders by unticking the “Apply to all folders” checkbox. The chosen Reading Pane setting will be set as a default for all folders. You can then still use the Display Settings pane to modify it for specific folders if you want to.

