AutoCorrect and text formatting support
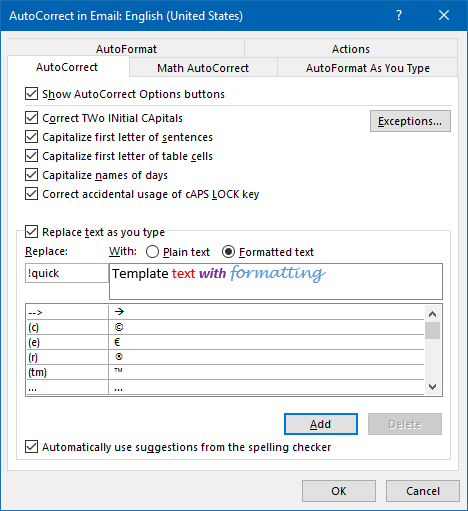
When adding an AutoCorrect entry, I noticed that there is an option for "Plain text" and "Formatted text". However, this option is greyed out and defaults to "Plain text".
How can I enable this option is order to store AutoCorrect entries with formatting?
 Saving AutoCorrect entries with formatting is supported but you’ll have to format and select the entry within a message. This selection is then automatically added to the AutoCorrect dialog including its formatting.
You can’t format the entry within the AutoCorrect dialog itself.
Write, Select and Add to AutoCorrect
- Type your formatted text, which you would like to add as an AutoCorrect entry, in a (new) message.
- Open the AutoCorrect dialog;
- Outlook 2003 and previous with Word set as your email editor
Tools-> AutoCorrect Options… - Outlook 2007
Office Logo-> button Editor Options…-> section Proofing-> button AutoCorrect Options… - Outlook 2010, Outlook 2013 and Outlook 2016
File-> Options-> Mail-> button: Spelling and AutoCorrect…-> Proofing-> button: AutoCorrect Options…
- Outlook 2003 and previous with Word set as your email editor
- Your template text will automatically be copied into the replacement text field.
Type your keyword and make sure you select the "Formatting text" option to maintain the formatting.

Saving AutoCorrect entries with formatting
Note 1: An additional benefit of using the “Formatted text” option is that it also allows you to create AutoCorrect entries which are longer than 256 characters.
Note 2: For more about using AutoCorrect and message templates see this guide.
Extra Tip: Add AutoCorrect Options to you QAT or Ribbon
 As the AutoCorrect dialog is quite deeply buried into the Options dialog, adding multiple AutoCorrect entries with formatting can be a very tedious process. By adding the “AutoCorrect Options…” button to your Quick Access Toolbar (QAT) or Ribbon (for instance on the Review tab), you can significantly speed up this process.
You can find the “AutoCorrect Options…” button when you set the “Choose commands from:” dropdown list to: All Commands.
To add it to the Review tab, you must first add a “New Group” to the Review tab.
For more information about customizing the Ribbon see: Adding commands to the Home or Message tab of the Ribbon.

