Change back the message list look in Outlook 2013 or Outlook 2016
The message list has changed quite a bit in Outlook 2013.
- The mail icons are gone and has been replaced with a blue bar
- The subject is now in blue
- The sender name is being displayed larger than the rest
- The first line of a message in now being displayed.
I don't find this new configuration very clear and, due to some other UI changes as well, I now see 4-6 messages less in my message list than I did in Outlook 2010.
How can I set it back to the way it was in Outlook 2010?
The Message List indeed got quite the overhaul in Outlook 2013 and, depending on your account type and how you upgraded to Outlook 2013, some of your view settings will be changed as well.
In part, the changes were to clean up the interface. For another part, the changes were to account for touch based devices as well without the need for 2 separate interfaces.
For the large part, you can switch it back to the way it looked in Outlook 2010. Especially when you are on a smaller screen, this will allow you to claim back some vertical viewing space and see more messages in the message list.
Note: The interface remained largely the same in Outlook 2016 so you can also use this guide to give Outlook 2016 a more “classic” look and feel.
Blue Bar instead of read/unread envelope icon
This is a thing which can't be changed back to the way it was in Outlook 2010; The read/unread envelope is gone.
Instead, you now have a blue bar indicating whether or not you've read a message. Special icons for reply, forward, Out of Office replies, Meeting invitations, etc… are still being displayed on the right side above the time/date of the received message.

![]()
The color of the bar can be customized in the same way that you can change the color of the subject.
The subject is now in blue
The blue subject matches with the new "house color" of Outlook 2013, but if you do not like this and prefer it being black again or another color, changing it is easy enough.
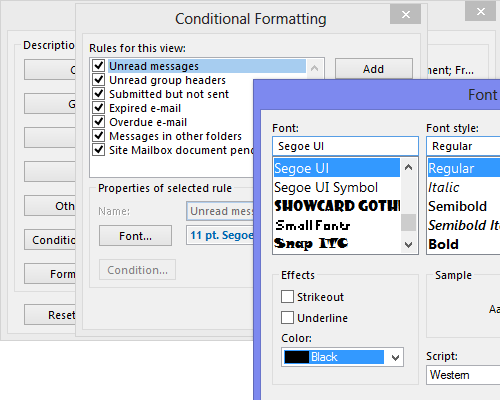
Tab View-> button View Settings-> button Conditional Formatting-> select: Unread messages-> button Font… Here you'll find a list of 16 additional colors too choose from (although not all of them are very usable).

The sender name is being displayed larger than the rest
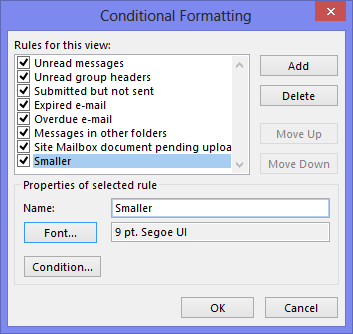
To decrease the name of the sender back to a similar size as in Outlook 2010, you need to go back to the "Conditional Formatting" dialog as indicated above.
I said "similar size" as in Outlook 2013, you can no longer specify 8pt as the font size but only "smaller" which is the same as 9pt.
Anyway, to reduce the display size of the sender name, add the following very simple Conditional Formatting rule by pressing the "Add" button:
Name: Smaller
Font: Smaller
Condition: No need to set any
Note: Click "Yes" when a warning shows that you have not set any conditions.

The first line of a message in now being displayed
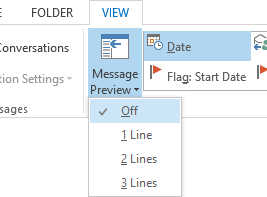
To remove the first line of the message from the Message List, switch to the View tab, click on the Message Preview menu button and select: Off

Separator line between messages
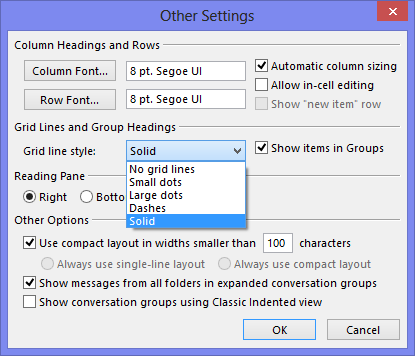
Another change in the Message List is that now a separator line is being displayed between the messages. You can disable that in the following way:
tab View-> button View Settings-> button Other Settings…-> drop down list: Grid line style: No grid lines
Disabling the grid line might not be the best way to go though as, with the removal of the envelope icon and only showing the message flag when hovering on an item, it will make it harder to separate between the individual items. The regained amount of vertical viewing space is also minimal.

Bonus tip: Place the Navigation Strip back in the Navigation Pane
If optimizing vertical viewing space really is a priority, then you can also configure the Navigation Strip to be placed back into the Navigation Pane.
To do this choose: View-> Folder Pane-> Options-> Compact Navigation

Results: Items visible
The following shows the results for a screen with 768 pixels in height, the Windows dpi settings left to 100% and Outlook maximized.
Outlook 2010 – default view: 14.5 items
Outlook 2013 – default view: 8 items
Outlook 2013 – custom view and Compact Navigation: 11.5 items
Outlook 2013 – custom view, Compact Navigation and minimized Ribbon: 13.5 items
Note: To read more about the changes in Outlook 2013 and how you can work or "deal" with them see the guide: 36 Short questions and tips for Outlook 2013

