Setting up a Team Calendar
To have an overview of each other’s activities and availability, we were thinking about implementing a Team Calendar.
What would be the best way to approach this and how would we synch our personal Calendars with this Team Calendar?
When you are in an Exchange environment, rather than to create an additional Team Calendar, consider sharing your Calendar with your team mates instead.
By creating a Calendar group for your team, you can quickly select them all and display them in the Overlay View to get a combined overview of the activities and availability of the entire team.
Step 1: Sharing your Calendar and set what is visible
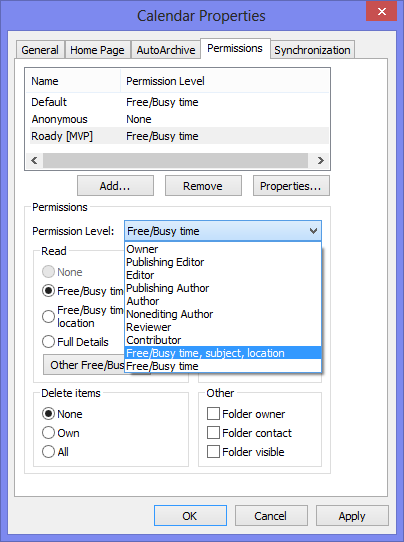
To share your Calendar, right click on it and choose Properties. Here you’ll find a Permissions tab where you can add people and grant them specific access rights.
For instance, you can grant them to only see your availability (Free/Busy time), allow them to see the subject and the location but also to allow them to create new items in your Calendar folder or to update existing ones. You are in control!

The permissions available depend on your version of Outlook and Exchange.
Note: If the default permissions have been set to “Free/Busy time” and that is all that you want to share, you don’t have to explicitly add your team mates.
Step 2: Open the shared Calendar of a team mate
Once you’ve all shared your Calendars between each other, you can open them in the following way:
- Outlook 2003, Outlook 2007 and Outlook 2010
File-> Open-> Other User’s Folder… - Outlook 2013
File-> Open & Export-> Other User’s Folder
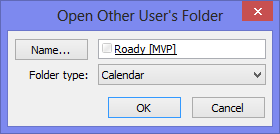
Type the name of the team mate of which you want to open the Calendar folder or click on the “Name…” button to select it from the Global Address List.
Make sure that the folder type to open has been set to “Calendar”.
Repeat the above for all your team mates.

Opening another user's Calendar folder.
Step 3: Creating a group for your team
Once you’ve opened the Calendar folders of all your team mates, creating a group for your team will enable you to keep them together and select them all at once.
Creating Calendar Groups own your own is available in Outlook 2007 and later. To create a Calendar Group, you must set your Navigation Pane to the Calendar Navigation (keyboard shortcut: CTRL+2).
- Outlook 2007
There is an “Add New Group” option at the bottom of the Navigation Pane - Outlook 2010 and Outlook 2013
Right click on an existing Calendar Group (such as “My Calendars”) and choose “New Calendar Group”.
You can now drag & drop the calendars of your team mates into this group.

That's one super team!
Step 4: Using Overlay Mode
The last step it to display all the calendars of your team mates in Overlay Mode. Overlay Mode is available in Outlook 2007 and later.
Having created a Calendar Group, clicking on the selection box in front of the Calendar Group name will select all the calendar in this group.
Your calendar will now probably be shown side-by-side or on top each other.
When they are shown side-by-side, you can enable Overlay Mode in the following way
- Outlook 2007
View-> View in Overlay Mode
(the option then changes to View in Side-By-Side Mode) - Outlook 2010 and Outlook 2013
tab View-> group: Arrangement-> button Overlay
When they are shown on top of each other, your view arrangement has been set to “Schedule View” (which has been introduced in Outlook 2010). On the View tab, you must first change your arrangement to the Day, Work Week, Week or Month view before the Overlay button becomes available.

Overlay Mode creates a single calendar view from multiple Calendar folders.

