Restoring a pst-file of a POP3 account on a new computer
I've backed up my pst-file of my POP3 account from my old computer and now want to use it on my new computer.
I've been told not to use the Import feature to restore my pst-file but to reuse it when setting up my account in Outlook. That way I should be able to keep my rules, view settings and various other personalization settings.
That sounds great and I would prefer not to lose too many of my settings but how exactly do I need to restore my POP3 pst-file to keep all these things?
 When setting up Outlook on your new computer or when you recreate your mail profile, it is indeed best to directly configure it with your original POP3 pst-file rather than connecting to it afterwards.
If you created the backup of your pst-file as a direct copy of the original rather than using an Export, then you'll indeed find various customizations are still there after a proper restore.
While the instructions below will allow you to restore your pst-file with your rules intact, it never hurts to export your rules to a separate rwz-file just in case.
Restore your pst-file to a convenient location
 Before starting to configure Outlook, restore the pst-file to a location on your local hard disk which is convenient for you. For instance, place them in a folder called Outlook files in your (My) Documents folder.
Do NOT place it directly in the root of a drive such as directly under C:\. This could lead to permissions issues. Placing it in a manually created subfolder such as C:\MyData\ isn’t an issue. Even better would be to use a subfolder on a separate partition dedicated to your data such as D:\MyData\.
Also verify that after restoring the pst-file the Read-only file attribute isn’t set on for it. To check this, right click on the file and choose Properties.
Outlook – Microsoft 365 subscription
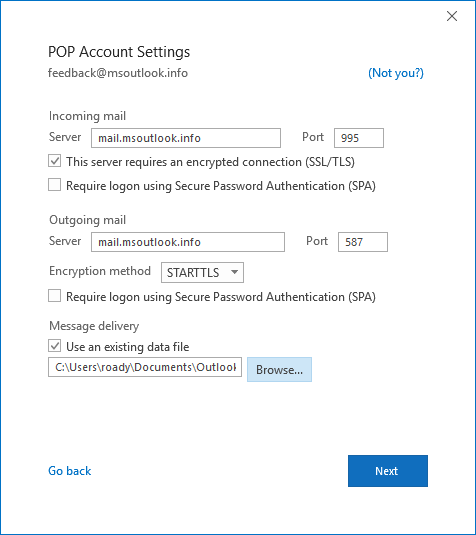
 When you are using Outlook as part of a Microsoft 365 subscription, re-using the pst-file when setting up a POP3 account is fairly easy but involves a few specific steps.
- Add a new account; When this is the first time you start Outlook, you’ll automatically get prompted to add an account.
- Fill out your email address.
- Select the “Advanced options” and select the option; Let me set up my account manually.
- This is to prevent that your account will be added as an IMAP account (if available for your account) or that Outlook will create a new empty pst-file when POP3 settings are found.
- Press the Connect button.
- From the account selection dialog, select: POP.
- When prompted, provide the password for your account and press Connect.
- If the connection fails at this point, you’ll get prompted for your credentials again. Press the Cancel button and then select; Change Account Settings.
- Verify your POP3 account settings or fill them out when nothing was found.
- At the bottom of the dialog, select the option: Use an existing data file.
- Browse to the pst-file.
- Complete the account setup process.

The advanced Add Account process for POP3 account allows you to reuse your existing pst-file.
Note 1: Even though your rules are maintained this way, it is quite likely that you’ll have to remap your “Move to folder” rules. This usually comes down to selecting the rule, clicking on the folder name in the bottom pane and confirming the folder.
Note 2: If you restored a pst-file that was last used in Outlook 2007 or previous and had configured Outlook to leave a copy on the server, then your on-line emails will be redownloaded. For more info see the “Dealing with Duplicates” section below.
Outlook 2010, Outlook 2013, Outlook 2016 and Outlook 2019
 When adding your account, it is best to select the manual account configuration. This is because Auto Account Setup would otherwise configure your account as an IMAP account (if available for your account) or create a new empty pst-file when POP3 settings are found.
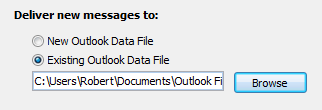
After specifying your account details, use the option “Deliver new messages to: Existing Outlook Data File” to direct it to your restored pst-file.

Directly configure Outlook to re-use your original pst-file
when setting up your POP3 account.
If you already have your account configured, you can use the Outlook 2007 instructions below as well but in Step 1 use;
File-> Account Settings-> Account Settings…
Note 1: Even though your rules are maintained this way, it is quite likely that you’ll have to remap your “Move to folder” rules. This usually comes down to selecting the rule, clicking on the folder name in the bottom pane and confirming the folder.
Note 2: If you restored a pst-file that was last used in Outlook 2007 or previous and had configured Outlook to leave a copy on the server, then your on-line emails will be redownloaded. For more info see the “Dealing with Duplicates” section below.
Outlook 2007
 The reconfiguration process for Outlook 2007 is quite precise or otherwise you could lose some settings which are kept within your pst-file such as Message Rules and Custom Views.
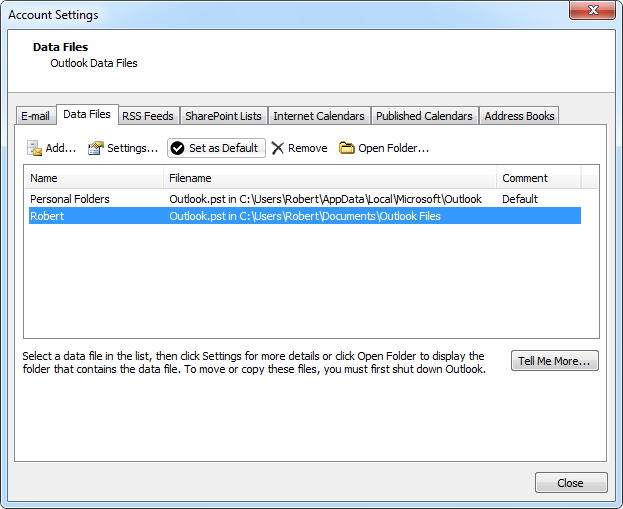
- After adding your POP3 account, choose Tools-> Account Settings…
- On the Data Files tab, press Add…
- Confirm the “New Outlook Data File” dialog
- Browse to the location of the restored pst-file.
- Select and open it.
- Confirm the “Personal Folders” dialog or optionally change the Name field.
- Verify that the pst-file you just added is selected.
- Press the Set as Default button.
- Confirm the warning that you get.
- Restart Outlook.

Changing the default pst-file to your original pst-file.
After restarting Outlook, you can remove the newly created empty pst-file via;
Tools-> Account Settings…-> tab Data Files-> select the pst-file-> Remove
Note 1: It is important that you do not close the Account Settings dialog during this procedure and do not connect to the pst-file via File-> Open-> Outlook Data File…
Doing so will result in the loss of various meta data (including rules!) of the restored pst-file.
Note 2: Even though your rules are maintained this way, it is quite likely that you’ll have to remap your “Move to folder” rules. This usually comes down to selecting the rule, clicking on the folder name in the bottom pane and confirming the folder.
Note 3: If you previously had Outlook configured to leave a copy on the server, then your on-line emails will be redownloaded. For more info see the “Dealing with Duplicates” section below.
Dealing with duplicates
 When you restored a pst-file from Outlook 2007 or previous and had your POP3 account on your previous computer configured to leave a copy on the server, then the emails that are available in the Inbox folder of the mailbox on server will be redownloaded. To prevent this, see Don’t re-download all emails.
If your emails already got redownloaded, see Clean up duplicates after emails got redownloaded.
What's not included in the pst-file
 While more and more settings of Outlook are stored within the pst-file, there are various files and settings which are not included that you want to take note of such as;
- Account settings
- Signatures (they can be copied from your Sent Items though)
- Custom Stationery
- Quick Parts
- AutoText
Some of these settings and files can be backed up and transferred manually.
Note: For additional backup and restore scenarios, also see our full backup and restore guide.

