Quickly deduplicate contacts without 3rd party tools
Over the years I’ve created a lot of contacts and due to merging and synching of data during that time, I sadly also have quite some duplicates.
Does Outlook have an option to delete or merge these duplicate contacts?
 Outlook does hold some basic de-duplicate techniques but they usually only apply at the time that you try to create a contact which already exists. However, with some creativity, you can still quickly dedupe or merge your contacts.
To do this, we use a little “Move, Export, Import and Move Back” trick. The process below might seem long and complicated but it can actually be achieved within only a few minutes.
Step 1: Move your contacts to a new Contacts folder
- Create a new Contacts folder by right clicking on your current Contacts folder and choosing “New Folder…”
In this example, the folder is called: Dedupe - Select all your contacts (CTRL+A).
- Move your Contacts from your Contacts folder to the Dedupe folder (CTRL+SHIFT+V)
Step 2: Export your contacts to a csv-file
- Start the “Import and Export” wizard of Outlook.
- Outlook 2007 and previous
File-> Import and Export… - Outlook 2010
File-> Open-> Import - Outlook 2013 and Outlook 2016
File-> Open & Export-> Import/Export
- Outlook 2007 and previous
- Select: Export to a File
- Select: Comma Separated Values (Windows)
- Select your Dedupe folder created in Step 1.
- Save the file to a convenient location.
In this example, we save the file to the Desktop and call itdedupe.csv - Click Finish in the final screen of the Export wizard.
Step 3: Import your contacts from the csv-file
In this step, we’ll import the just exported csv-file to the emptied default Contacts folder.
Note: If you are using an Outlook.com account in Outlook 2013, please see the ”Special notice” section at the end of this article for alternative instructions.
- Start the “Import and Export” wizard of Outlook.
- Outlook 2007 and previous
File-> Import and Export… - Outlook 2010
File-> Open-> Import - Outlook 2013 and Outlook 2016
File-> Open & Export-> Import/Export
- Outlook 2007 and previous
- Select: Import from another program or file
- Select: Comma Separated Values (Windows)
- Browse to the exported file which you created in Step 2 (
dedupe.csv). - Important! Select the option: Do not import duplicate items
- Select your main (currently empty) Contacts folder as the destination folder.
- Click Finish in the final screen of the Export wizard.
Step 4: Move back and merge your original contacts
- Select your Dedupe folder.
- Select all your contacts (CTRL+A).
- Move your Contacts from your Dedupe folder to the Contacts folder (CTRL+SHIFT+V).
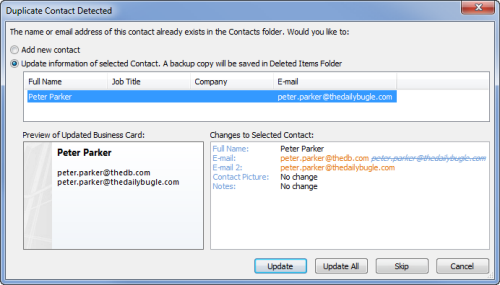
- For each duplicate that is being encountered, you’ll get prompted and it will show a preview of which data will be added or updated.
- Choose Update to update the current duplicate contact.
- Choose Update All to automatically accept all changes for all duplicates.
- Choose Skip if you want to review this contact later; the original will remain in the Dedupe folder.
- Choose “Add new contact” if they are in fact not the same contact.

When updating an email address of a duplicate contact, the former address will be pushed to the “E-mail 2” field. (click on image to enlarge).
Note: Rather use a Duplicate Remover add-in after all? There are many to choose from.
Special notice: Outlook.com EAS account in Outlook 2013 and Outlook 2016
 If you are using an Outlook.com account configured as an Exchange ActiveSync account (EAS) in Outlook 2013 or Outlook 2016, then you can’t import your contacts directly to the Outlook.com’s Contacts folder in Outlook.
Instead, go to the People hub on the Outlook.com website and use the “Import from file” link instead and select to import from: Microsoft Outlook (using CSV).
As an alternative, you can also create a Contacts folder in a pst-file or Exchange mailbox in Outlook for the Import procedure and then move them back to your Contacts folder of your Outlook.com account.
- If you do not have a pst-file or Exchange account connected to Outlook yet, create a pst-file via:
File-> Account Settings-> Account Settings-> tab: Data Files-> button: Add… - Switch to the Contacts Navigation (CTRL+3).
- Switch to the Folder tab and click: New Folder
- Create a new Contacts folder and make sure to create it in the pst-file or Exchange mailbox.
- Use Outlook’s Import procedure as instructed in Step 3 but of course import the csv-file into the newly created Contacts folder.
- After the import has completed, move the imported contacts from the Contacts folder created in the pst-file or Exchange mailbox into the Contacts folder of your Outlook.com account.
- Continue with Step 4.

